Fishing Simulator 2 - User Instructions
| Introduction Thank you for using Fishing Simulator 2. If you are new to Fishsim, it can be a little daunting at first getting to know the way around. There is an in game manual to help, but not a printed one, nor any information is present with the CD ROM, therefore this page has been created in a printer friendly format to help and use as reference. Every effort has been made to make Fishing Simulator 2 as easy to use as possible, while retaining the many options there are available. Fishing Simulator 2 isn't a game as such, but an attempt to simulate real world angling. This isn't to say that it does accurately reflect real world angling, but a attempt has been made to do this. A lot relies on the way venues are created and Fishing Simulator 2 allows venues and addons to be created freely to any rules, so if the pike start feeding on sweetcorn, it is because they have been told to do so by the venue, not the game. There is no real objective within the game, apart from the catch fish and beat your own personal best catches. Whether you're into float, ledger, lure, fly or sea fishing, Fishsim 2 has it and tries to accurately simulate all aspects of this wonderful sport/pastime. Now you can carry on fishing on cold wet days in the comfort of your own home. |
Getting started
Okay, so your CD ROM has just arrived, what next ?
Well the first thing to do is to insert the CD ROM into the CD ROM drive on your computer. You should notice the drive start 'whirring' soon after inserting it, this is a good sign and means that fishing simulator 2 is being installed from the CD ROM onto the hard disk drive inside your PC. It does this, so that you do not need to have the CD ROM in the drive each time you play.
After a short while, you will see a disclaimer, you need to read through this and click the "I agree" box, followed by the next button.
The next thing you will be asked, is which folder on the hard disk you want to install fishing simulator 2 to. It will default c:\Program Files\Fishsim2. This folder will do, so click the Start button. The files from the CD ROM will then be transferred to the hard disk drive, this may take a minute or so, depending on the speed of your PC and CD ROM drive. After a while another screen will pop up telling you that fishing simulator 2 is installed. This will also ask if you want to view the "readme" file that comes with it. This is just a text file of basic instructions and other information, this page contians more detailed information than in the text file though.
You're now ready to go, for the time being keep the CD ROM in the drive though as it will be needed shortly.
To start fishing simulator 2, click on the windows start button on your desktop, select the programs menu option, then select the fishsim2 menu option from there and click on Fishing Simulator 2. The game will now load for the first time and you will be greeted with a welcome message and an option to enable the yellow guidance tips. With this being the first time run, it is advisable to have these on, as they do provide brief instructions on most screens within the game.
You will then be asked to enter your name, on a screen titled "New membership application card". Type in the name you would like to use on the keyboard, making sure it consists of only letters and spaces. Then click the continue button.
For now, just click the continue button on the club membership book page, there is more information on this later on this page.
You're now at the main game menu. Lets leave the descriptions of all the options until a bit later on the page, and go and catch ourselves a fish ! - Click on the Go fishing button on the main menu. You will now see a screen telling you where you are about to fish, on the River Lot venue, and on Peg two, you will also see a small picture of the peg in the centre of the screen.
Underneath that picture there is a box with Real time mode in it. What this means is you will be fishing on the real date at the real time. If you are following this at 9 o clock at night in December, then you may struggle a bit to find a fish, so the best thing to do is click on the Real time mode box, this will allow you to select the date and time you want to fish. Select August the 7th at 9:00, to give yourself a fighting chance of finding some fish, then click the Close button.
Now click the Go fishing button on the bottom right of the screen, and a small window will pop up tellling you it is the first time you've fished the venue, so weather and temperature information will be generated. This shouldn' t take that long to do, a few seconds, but after that you'll find yourself sitting on the banks of the River Lot with rod controlled by the mouse.
Point the rod towards an area on the peg, and press and hold the RIGHT mouse button .... keep it pressed until the rod lifts quite high in the air then release it. You should have just made your first cast and a float will be hurtling its way out into the water. Then all you need to do is wait, and wait.... and wait, until a fish comes along, at which point you'll see your float start to bob, or even shoot off if it's a carp. Strike by pressing the LEFT mouse button and raise the rod quickly by pulling back on the mouse. If you've hooked it, you'll see a landing net appear and will then be able to play the fish into it, using the mouse to move the rod and the LEFT mouse button to reel in line. Providing you don't snap, or lose the fish, you'll see the species and weight of the fish you have landed. You can then re-cast out with the RIGHT mouse button and try for another. However, that's the fun bit over with, there is plenty enough time for more fish later, you need to delve a bit deeper into Fishsim by learning the many options, so press the ESC button on the keyboard and return to the main menu. Note if you managed to catch a fish, you'll see a keepnet screen before this showing the fish you caught.
Okay, hopefully that gave a feel for Fishsim 2 and you managed to catch a fish. This was only on a single peg on a single venue, there are over 500 pegs on the CD ROM, and over 450 venues on the Internet waiting to be fished. The first thing you'll probably want to do is get some of them extra venues into the game so they become available to fish ( that is why I suggested leaving the CD ROM in earlier ).
From the main menu, choose Options, then select the Advanced button, then the Import addon button. You will see and empty list of available addons come up, click the CD ROM button at the bottom of the screen, the list will then fill with all the extra available addons on the CD ROM. Scroll down the list and find the xspecies.jr2 addon right at the very bottom and click on it. This addon contains additional fish species which are required by the extra venues on the CD ROM, so it is an important addon to import first. You'll see a description of the addon, and you will need to click the Yes button to confirm you want to import the addon. A blue status bar will indicate the import progress and when complete you will get a message telling you the addon is imported but fishsim2 will need to be restarted for it to take effect. Don't do this now, let's import a few more first, then restart, this is okay, you do not have to restart after every import.
Follow the same process over to import the addons you want, each should have a small description about them telling you what they are. After you're done importing, go back to the main menu and exit fishing simulator, then restart it again. Make sure you import the royadown.jr2 addon, as this venue will be used in a minute as an example. NOTE : addons only have to be imported once, once they have been imported they will be there forever and you DO NOT need to follow the same process of importing before using them.
After restarting, you'll notice a difference from the first time you started FS (above), first you won't get the welcome message, and second, fishsim will have remembered your name on the members book. Click continue, then Go fishing again. On the screen that shows you where you are about to fish, click on the River Lot name in the box, and a drop down menu will appear, showing you all the venues you have available to fish. Select La Roya - Italy from the list, and make sure the peg selected is The corner, then click the Go fishing button in the bottom right.
Hey, now back fishing again, same setup though a float setup with a maggot. Maggots aren't brilliant on La Roya, so lets change the bait to a caster, press the C key on the keyboard, and use the arrow on the Hook bait to change the bait from the maggot to caster, then close the bait selection window off and do a bit of fishing.
You now pretty much have the basics of fishsim, there is a lot lot more to it though, but at least you've got started and caught some fish. You'll stand a lot better chance at catching though if you read through the rest of this page, which contains information on things like changing tackle, loosefeed as well as the mass of other options that are available to explore.
Updates
Fishing Simulator 2 is continually updated to add extra features, this guidance on this page refers to version 2.10b, which is the current version at the time of writing. This is probably not the current version on the CD ROM as these were produced before the latest updates. To find out your current version, look at the text at the bottom of the main menu screen, if this is lower than version 2.10b, there is a small update available. This update can be found by clicking here. It is recommended you download and install the latest update to not only gain the benefits of the additional features, but also be within internet match rules, where organisers commonly insist all anglers use the latest version.
Club membership book
The club membership book is the first screen you see each time you start fishing simulator 2 and it contains a list of all the anglers that have been added. Members are human anglers ( players ), and you should have a name listed for each person who has fished at least once. Initially there will be no members names listed and you will be prompted to enter your name so that it can be added to the members page. From that point on, every fish you catch will be recorded and you will have access to your own personal record catches for each species.
New members can be added at any time by using the new member button. There is no limit to the number of members you can have listed. The current selected member will be highlighted in blue on the members list, each time you start Fishing Simulator 2, you should make sure it is your name that is highlighted. If not, click on your name in the list to select it.
Adding a new member
There are no limits to the number of different anglers you can have in Fishsim 2, and each new member will have his or her own personal record catch page.
When you first run fishing simulator 2, there will be no members listed in the members book and you will be prompted to enter your name. Type your name in the box provided using the keyboard, being careful to use only letter characters and the space keys, you must also keep each member name down to a maximum of 30 characters long. The name entered is what you will be known as, and will be used if you enter any interactive matches or submit record catches.
After entering a new members name click the continue button to proceed, the new members name will then appear in the main members list. If you change your mind during the process of adding a new member, click the Cancel button.
Deleting a member
There maybe times when you need to remove an angler from the members page. To do this the Delete button on the members screen can be used. This will delete the current selected member ( highlighted ), and will permentantly remove them along with record catches and any other information, so this option must be used with caution. To safe guard against accidental deletion you will be asked to confirm the action.
Tackle selection
Fishsim 2 allows four different general styles of fishing, all tackle options are accessed by selecting the Tackle button from the main menu or by pressing the T key on the keyboard while fishing.
- Float fishing
- Ledgering
- Lure fishing / spinning
- Fly fishing
:Float fishing involves suspending a static bait below the surface of the water.
Ledger, like float fishing, involves a static bait fished normally on the bottom, although floating freelined baits can also be used.
Lure fishing or "spinning", involves fishing with an artificial lure which mimicks a fish swimming or in distress.
Fly fishing is similar to lure fishing but not restricted to mimicking fish, but insects and flies as well.
The first decision you should make is which style of fishing you are going to use. It is possible in Fishsim 2 to fish with two rods at the same time, however the second rod can only be used as a ledger rod ( more on this later ). The decision made will depend on the venue or peg being fished as well as current temperature and date. Once you've made your mind up on your style of fishing, you can then go on to choose the rod or rods you will be using.
Rod selection
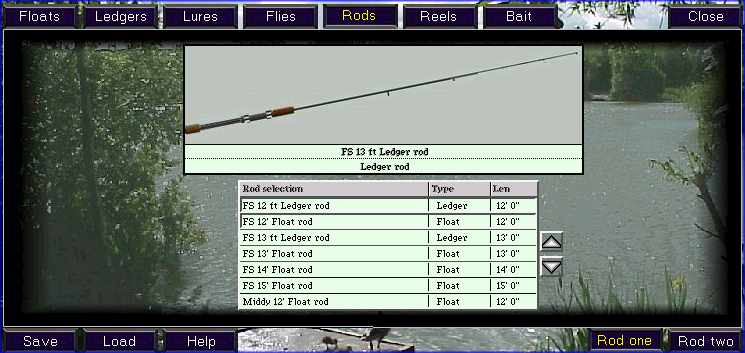
To select a rod, click on the Rods tab at the top of the tackle selection screen, you will then see a picture of the current selected rod, along with a list of available rods to choose from. To select a rod, click on the name in the list, which can be found by using the up and down arrows to scroll through the available rods. Note : with the Rods tab on you are selecting the rod to use for whichever rod ( rod one or rod two ) is selected in the bottom right corner.
A common question is, how to fish with two rods at the same time. To do this, select the Rod two button in the bottom right corner of the screen, then click on the Rods tab, a checkbox will appear "use this rod" click this so that it is on ( green ), and you will now have activated the second rod ready for use. Because it is possible to have two rod setups, the buttons in the bottom right ( rod one, rod two ), determine which rod you are setting up, you can alternate between these by clicking on them. Note, you cannot select seperate bait with the second rod ( see later ).
Reel selection
To select a reel for a rod ( specified by which rod is selected in the lower right ), click on the Reels tab on the tackle screen. You will see the current selected reel, as well as a list of availble reels to select from. The reel type abreviations and reel info abreviations are shown in the tables below :
Code Meaning FS Fixed spool CF Closed face CP Centrepin SP Spinning reel Mu Multiplier Reel info D Has drag adjustment A Has auto-reel facility S Has reel speed adjustment
Line selection
As well as reel selection this screen also allows you to select the main-line that will be loaded onto the reel. Mainline selection is important because different reels have different spool sizes, and can hold different amounts of each line. At the buisness end in Fishsim, you use a hook length leader, attached to this mainline.
The list of available lines is initially sorted into alphabetical order, however you can click on the bks ( breaking strain ) title to list the reels in strength order. The types list identifies what type of line it is :
Code Meaning Ny Nylon line Mo Monofilament Br Braid Fl Fly line Wi Wiretrace
Note : wire traces can only be used as hooklengths and not loaded onto a reel spool, so are not shown on the mainline selection list.
To specify the leader / hook line, an option is available on the Floats, Ledgers, Lures, and Flies tabs, called Hook line.
Hook selection
When fishing with a float or ledger rig ( see later ), you will need to specify which hook you want to attach to your hook line, there is a button on the Floats and Ledgers tab labelled Hooks that will allow you to select or change your hook. When selected a list of available hooks will be displayed along with the current selected hook for the rod.
Hook sizes are strange with higher numbered hooks being smaller in size, so for example a size 16 hook is smaller than a size 10. The type column can be either Si (single), or Tb (treble). The barb column, shows if the hook has a barb and what type of barb it has. Fishing with barbed hooks is allowed in FS, as we're only catching virtual fish, but the disadvantage to it, is that there is a slightly higher risk of not hooking a fish on a barbed hook, than a barbless one. The benefit to using barbed hooks however, is that fish find it a lot harder to free themselves from the hook when being reeled in.
Setting up a float rig
The first rod can be set up for fishing with a float, to do this select the Floats tab on the tackle selection screen and choose a float from the list available. Floats are listed alphabetically, and there are four different types of float. The codes below are used to describe each :
Code Meaning Eyed Eyed float ( waggler type ) Band Rubber band connected float Cont Controller float Sld Slider float
Eyed floats require that two split shot are placed either side of the float eye on the line to prevent the float sliding up and down the line. This is important to remember with them, missing a shot of the rod side of the eye, will result in the bait sinking to the bottom, and bites will not register on the float.
Floats connected by bands, do not require lock shot because they are firmly held onto the line with two rubber bands.
Controller floats are used for fishing baits on the surface at distance. Baits such as bread crust and flake, are very light, so just a hook with these on is difficult to cast out any distance, therefore a controller float can be used to give the setup some extra cast distance.
Slider floats are used for fishing deep water, deeper than the length of the rod. You can only set the float depth to a maximum of the rods length, any deeper than this and casting becomes impossible ( real life ), so fishsim doesn't even give the option. If you need to fish deeper though, the slider float is the way to go, it can run freely up the line, until it meets a stop knot tied into the line, which can be a depth deeper than the rod length.
There are four further options on the floats tab ; Floats, Attachments, Hook line, and Hooks, three of these have already been covered, but attachements needs some explaining still.
Attachements are things that attach to the line, like split shot, and you can add upto 8 per rig. To add an attachment, click the name in the list, and move the cursor to the position on the rig where you would like to place it. When you are happy with the placement, click the left mouse button to attach it.
If you need to alter the float depth, or attachements on the rig, make sure the attachments button isn't selected and move the cursor over the piece of tackle you want to alter, the cursor will change. To remove an attachment press the RIGHT mouse button, to slide it along the line, click the LEFT mouse button and move the mouse, keeping the left mouse button pressed all the time. When the new position is to your satisfaction, release the left mouse button to move it. You can adjust the float depth in the way aslo.
Setting up a ledger rod
Both the first and second rods can be set up for ledgering.
To set up one of the rods for ledgering, click on the Ledgers tab on the tackle selection screen an select a ledger rig from the list, each of the rigs available are described briefly below. Ledger rigs can have an additional attachment added to them ( See attachments above ), the position and removal of the attachments, feeders and weights is achieved in the same way, by dragging with a left mouse press, or to remove, by moving the cursor over the attachment and clicking with the right mouse button.
Bolt rig
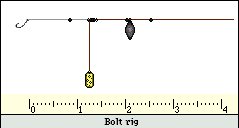
The bolt rig can contain both a weight and a feeder, it is a common rig and is often used by carp anglers, as a self hooking rig. Species like carp will pick up a bait and run with it, pulling the line through the eye of the weight, until the point where the back stop shot hits the eye of the wieght, this causes a force to be applied to the hook, which hooks the fish. This is pretty safe in fishsim, however, this sort of rig shouldn't be used in this setup, when fishing for real. If for example, the line snaps between the stop shot and the rod, this can leave a fish trailing a weight around. The back stop shot can be omitted though both in fishsim and real life, and with the correct slack and tension on the line, the rod can be used to give the jolt instead of the back shot.
When the bolt rig is selected in Fishsim, you can add or remove the stop shot.
Fixed ledger
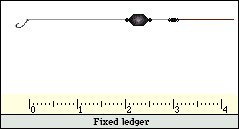
This is not an advisable rig to use but included for completeness. Bites won't register well, and fish will feel the weight shortly after biting, often causing them to drop and leave the bait.
Freeline
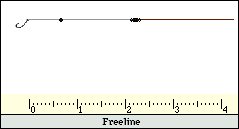
Freelining is a fun way of catching fish, but cast distances are poor due to the lack of weight on the rig. The lightest and most sensitive of all setups though.
Link ledger
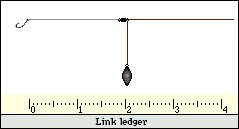
The link ledger rig in Fishsim is simple, and very similar to the paternoster, a weight or feeder can be attached to the link.
Paternoster
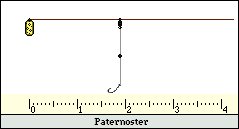
The paternoster rig is very similar to the link ledger above, but bites register slightly better, a weight or a feeder can be added to the end of the rig.
Ledger detectors
To select a ledger detector, click on the detectors button on the ledger tackle screen, you will then be shown a list of available ledger bite detectors. There are all sorts of different ledger detectors available from swingtips to bite alarms, or even just the rod tip itself. To select a detector to use for a rod, click on the name of the detector in the list.
Note, when ledgering with bobbins or bite alarms the detector will only activate after it has been put on the rod rest, other detectors like swingtips and quivertips do not need to be placed on the rests for them to work. Choice of bite detector when ledgering is personal and there are plenty to choose from as well as others available as addons.
Setting up a lure rod
The first rod can be set up for fishing with artificial lures. With rod one selected click on the Lures tab on the tackle selection screen, and a selection of all available lures will be displayed. To select a lure simply click on the name of the lure in the list.
There are three different types of lures and some abreviations in the list identifying the number and type of hooks on the lures these are explained below :
Code Meaning Sp Spinner / spoon Pl Plug Jrk Jerkbait
The hook descriptor specifies how many hooks, the size of each hook and whether they are single, double or treble hooks.
For example : 2 10 Tb is a lure with 2 size 10 trebled hooks.
You can also add a single attachment to the lure selection rig if desired, this is done in the same way as with floats and ledgers ( see above ).
Setting up a fly rod
Fly fishing in fishing simulator 2 is different from real life fly fishing in terms of action used, but the end result is pretty similar. You can set rod one up for fly fishing, by clicking on the Flies tab on the tackle selection screen and then choosing a fly to use from the list. You can select your leader line and add a single attachment to a fly rig as well. Note, that in FS2, the behaviour of the fly, is not determined by the line, but by the selected fly, some will sink fast, some slow, others will float on the surface.
Bait selection
You can choose upto 8 different baits to go fishing with, and a bait box is provided with each. To access the bait selection screen, click on the Baits tab on the tackle screen. Note, if you have accessed the tackle screen while fishing, by pressing the T key, you cannot change the contents of the bait boxes, the only time the contents of the bait boxes can be changed is prior to going fishing from the Tackle option on the main menu. Also, before selecting your baits to add to the bait box, please ensure rod one is the current selected rod.
The bait boxes are represented as circular bait boxes at the bottom of the bait selection screen, and each can be filled or emptied prior to going fishing. To empty a bait box, simply click on the bait box with the left mouse button. To fill a bait box, select a bait from the list of all baits displayed by clicking on it, then click the Fill bait box button, an empty bait box will then be filled with the selected bait.
You can also take upto 4 groundbait boxes with you to the bankside and these, like baits are selected prior to going fishing and the contents cannot be changed while fishing. On the bait selection screen the Groundbaits button will display a list of available ground baits with the four rectangular bait boxes displayed. Filling and emptying these bait boxes is exactly the same process as for hook baits.
Saving rigs
Setting up your rigs can be a time consuming process, like in real life, however you can save them in Fishsim 2, and load them at a later time to save you adding and adjusting the tackle again. The Save button in the bottom left of the tackle screen allows you to save the rig for the current selected rod. Before clicking the save button it is advisable to check that you have the correct rod selected by glancing over at the "rod one" or "rod two" buttons on the right. As soon as save is clicked you will be asked to give the rig a meaningful name, this must be made up of letters and number characters only and kept to a minimum in length. Be careful when saving rigs not to use the same name as an existing saved rig, as no warning is given and the old rig with the same name will be overwritten. Once you have entered the name, press the Enter / return button on the keyboard, that will make it available for future use via the load button. Note, bait box contents are not saved with rigs.
Loading saved rigs
To load a saved rig, press the Load button in the bottom left on the tackle selection screen. A list of your saved rigs will appear, and you can load one into the current selected rod by clicking on the name in the list and then clicking the load button. There are some pre-determined rigs already setup to use as well, although it is advisable you create your own personal favourites. You cannot load float, fly or lure rigs into the second rod, only saved ledger rigs will load in here. Also, the contents of the bait boxes are not stored in saved rigs so will not be altered.
Tackle selection notes
There are millions if not billions of different tackle combinations and setups in Fishing Simulator 2. It is impossible to explain all here, but with experimentation, different things and setups can be found. One of the biggest appeals within Fishsim 2 is the vast amount of different combinations that can be achieved, all resulting in different outcomes, some good, some bad, but the one thing you'll soon discover is that not all set-up's, tactics and baits work on every venue, they all alter and as such you will have to find these, when you do, please let me know.
Going fishing
To go fishing, click on the Go fishing option from the main menu, before clicking this though, you should have some idea of where you're going to be fishing as you will need this information to fill your bait boxes ready. After clicking Go fishing, a screen similar to below will be shown :
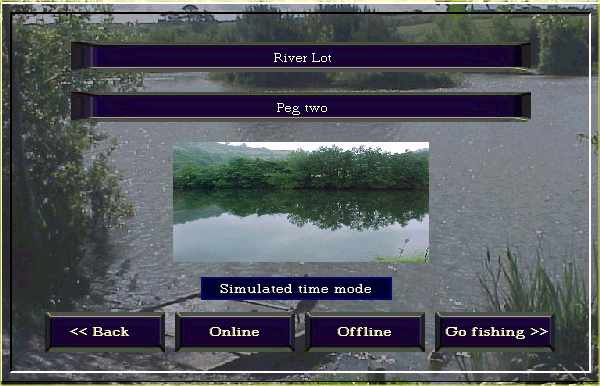
The two horizontal boxes at the top ( shown as River Lot and Peg two above ), show you which venue and peg you have got currently selected to fish. You can change these, by clicking on the boxes and selecting a different venues and pegs from the drop down boxes.
Below these, there is a small image of the peg you currently have set, you can click on this image to find out more information on the peg or venue selected. When clicked you will get a full screen preview of the peg, by moving the mouse over the water, the depth of each location the mouse if over will be displayed in a small flag. This can help finding holes or shallow areas of the peg. It can be quite tiresome though going through every peg in this way, so there is a peg contours button that will give a rough overview of the contours on the bottom of the peg ( example below - river dane peg 3 ),
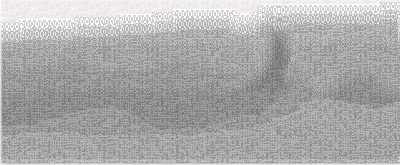
From this, you can see that there is a deeper channel ( dark ) down the centre of the peg, with another channel going towards the far bank.
You can also see any extra information the creator of the venue and peg has included by clicking on the peg info or venue info buttons, if nothing happens when these buttons are pressed, there is no extra information available. The venue and peg records buttons will give you the record catches all anglers using your computer have caught on the selected venue or peg ( see record catches later ).
To close off the peg information screen and return to the go fishing screen, press the close button.
Back on the go fishing screen below the peg image is another horizontal box, containing either Real time mode or Simulated time mode. This can be clicked on to set the date and time you are fishing. Real time mode is pretty difficult at most times, so it is recommended you change this by selecting a date and time more suitable for fishing. Right at the very bottom of the display screen you can see what time and date you have currently got selected, as the image below shows :
![]()
This also shows the current air temperature and weather condtions, as well as the sunset or sunrise time. If you are fishing a sea venue, you will not see the sunrise or sunset time, but instead a blue box with an arrow will be displayed indicating the tide height and direction of the tide. The longer the blue box, the higher the tide. If the arrow is pointing to the left, the tide is currently going out ( water level lowering ), if the arrow is pointing to the right the tide is coming in ( water level raising ). There are two high tides a day on sea venues in Fishsim 2, each occurring about 12 hours apart, and many species of fish will come in with the tide.
At the bottom, there are four option buttons, << Back, Online, Offline, and Go fishing >>. These allow you to choose what type of fishing session you want to do :
There are three types of fishing sessions in FS2 :
- Pleasure fishing on your own, accessed via Go fishing >>
- Offline match fishing via organised offline matches, accessed via Offline
- Online match or pleasure fishing via a TCP/IP network, accessed via Online
Each of these three types of session are described further below.
Pleasure fishing ( standalone )
Pleasure fishing is the most commonly used, and the easiest to understand. There are no rules to this type of fishing, you select where you want to fish, and at what date and time you want to fish, and for how long you want to fish. The main aims are to either, enjoy, practice or try and beat your own personal or global records. To start a standalone pleasure fishing session press the Go fishing >> button after you have selected the venue, peg and date/time you want to fish.
With this session, you can fish for as long as you like, when you are finished, you press the ESC key on the keyboard to go back to the main menu options.
Offline match fishing
Oflline matches are matches which are arranged by someone else, they specify the venue, date and time and the rules for the match and participating anglers fish within them rules. After each angler participating in the match completes the match, (s)he sends a file containing there results back to the organiser of the match, who then produces an overall match result consisting of the results of all anglers who participated in the match. Much of this is now automated on the Internet, however some organisers still use email to transfer results.
The process of fishing an offline match starts outside of fishing simulator on the Internet. First you have to find an organised match to fish, there are a few to practice and try on fishsim.net already to get you into it, after that there are many around on various sites to fish on a daily/weekly basis if you wish. A good source for finding out information on offline matches is the fishsim community forum ( www.fishsim.net/mb.htm ), match organisers will often post details of there matches here. The matches on fishsim.net are organised into mini-venue leagues with a selection of the standard venues. To find go to the following page : www.fishsim.net/addons.htm and select a venue from the available list for which you want to fish, there is full instructions on the matches links as to how to download matches, fish them, and submit the results. Result submission is automated, so you will be able to get instant feedback on how well you did and how well all other anglers did in each match.
Once you have downloaded a draw file and imported it, when you click the Offline button on the go fishing screen, you will see a list of matches available for you to fish ( example below )

To select a match, simply click on it in the list, as you do this, the text in the grey box below the list will display the match you have currently selected. The Delete button can be used to delete the match, this should be done after you have fished each match and submitted your results. The Details button, should be checked before fishing the match and will show you the rules for the match ( example below )

Most of the information is pretty simple to understand , so all won't be explained here.
After you have read the rules for the match, you can then go and fish the match by clicking the Go fishing button on the offline list screen. Fishsim 2 will then set the time and date, as well as the venue and peg for you, and put you at the bankside fishing the match. You can leave the match at any time with the ESC key, and continue it at a later time, you do not have to fish offline matches in one session, however, match organisers often specify rules as to how many times you can do this, if left and returned more than this, you could find the match organiser disqualifies your result.
When the duration of the offline match is complete, you will get a screen appear informing you the match has been completed and telling you the name of the results file and where you should send it to. This will be a file with a .f2r file extension and will be located in the Offline folder of fishsim2.
Online fishing
Fishing Simulator 2 will allow you to fish and chat with other people using a TCP/IP network which is what most Windows local networks are set up to use. It is also the protocol that the Internet uses, so matches can take place over the Internet as well, this is not a guaranteed or supported part of fishsim 2 though. Connections and transfers on the Internet are not reliable and full of different ways of doing things, that it is impossible to provide support for this type of use.
The first thing you will need to do to join an offline match server, is start the FS network server on another computer and make a note of the local IP address of that computer. Please note, the windows TCP/IP network needs to be configured properley for this to work, and if using a firewall this needs to be set to allow fishsim access to the network, or disabled ( not recommended ). The firewall that comes with Windows XP however, will need to be disabled, if you are using XP.
The alternative, is to look on the matches linke on the fishsim.net community forum to see a list of running online servers to join, make a note of the IP address of a server you want to join with pen and paper. An IP address consists of four numbers seperated by dots, and is used to identify a single computer on a network.
Then start fishing simulator 2, and from the go fishing screen, click the Online button, you will see a screen something like below :
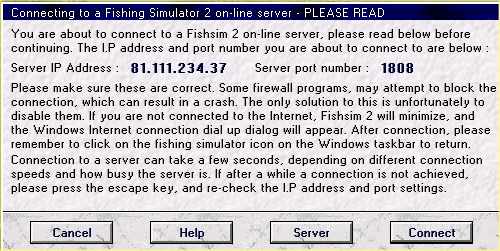
This is telling you the current IP address of the server, you will need to click the server button and enter the IP address of the noted server, then press the connect button.
Please note, often servers on the Internet set themselves up to only accept people using the latest version of fishing simulator 2, so before joining a server, you will need the latest update installed.
You should now, be connected to an online server and be fishing with other people, and should see a list of all the other people connected on the anglers screen in the clubhouse.
While connected to an online server, you can send and receive messages to and from everyone else. If in on one of the clubhouse screens, all you do is simply type the message, the text will appear at the bottom of the screen as you type, then when you have finished typing your message, press the Enter / Return key on the keyboard. The message typed will now be sent out to everyone. The lounge option in the clubhouse is the best place to do any chatting before you go fishing on the peg, this is set out in a similar style to an internet chatroom. There is more information on the help button in the clubhouse.
After you are connected, click the Go fishing button in the clubhouse to fish. While fishing messages can still be sent, but you have to press the F7 key first and then type your message.
After you have finished fishing press the ESC key to return back to the clubhouse.
There are thousands of different events that can occur online fishing, far too many to list here, but with use, all will become a lot clearer. Please remember though, that this allows direct communication over the Internet, and as such never give out personal details to anyone, and please remember that minors as well as adults use fishing simulator online. A match organiser can block people from servers for abuse and also is perfectly within there rights to report this to the host Internet Service Provider to act further on abuse. Fish fair, enjoy and have fun.
At the bankside
Whichever type of fishing you are doing, standalone, offline or online, you will always find yourself sitting at the bankside ready to cast in and start fishing. When you arrive, the first thing you should probably do is check your tackle and make any adjustments necessary for the venue and peg you are fishing. You can do this using the (default) T key on the keyboard. You should also check what bait you are using, this can be done with the C key on the keyboard, the tackle screens have already been described earlier and the bait selection will be described a bit later on this page.
Default fishing simulator 2 controls
There are many keys and controls that activate different things while fishing in Fishing Simulator, the table below lists all the default settings ( note, you can customise these - see later ).
Action Key Mouse Joystick Reel in Left Button 1 Cast out Right Button 2 Quick strike Middle Button 3 Change rod Space Rest rod Left CTRL Switch rods S Balearm B Change bait C Groundbait G Loose-feed L Change tackle T Increase drag Up arrow Decrease drag Down arrow Increase reel speed ] Decrease reel speed [ Auto-reel A Keep net Enter/return Minimise M Scroll left Left arrow Scroll right Right arrow Line out Pg up
Controlling the rod
Moving the mouse up/down and right/left controls the position of the rod, unless the rod has been put down onto the rod rests. With there being two rods available in FS2, the rod with the small hand by it, or the angler image, will be the one that is being controlled, you can alter this by pressing SPACE on the keyboard to control the other rod ( see later ). When a rod is on the rod rests, it will need a sharper movement of the mouse to lift if from the rest.
Reeling in
To reel in, press the left mouse button, if the balearm is current off, this will flick the balearm back on. Also, if you find with some reels ( centrepin ) for example, that the reel doesn't reel in line, but lets line out, you will need to adjust the reel speed settings using the [ and ] keys, as some reels have a feature to release line as well as reel it in. This is handy when trotting a river. In the top left / top right of the fishing screen, it will show you how much line is out, and how much slack line there is for each rod.
Casting out
Casting out, can be tricky to get right at first, but with practice it becomes second nature. Position the rod facing the direction you want to cast, it is easier if you move the rod low and parallel to the water surface to do this. Then press and hold the RIGHT mouse button, the rod will start to lift as you keep the button pressed. When you think you have pulled the rod back enough, release the RIGHT mouse button and the cast will follow. The longer you hold the right mouse button, the further the tackle will be cast in the direction the rod is facing. Different rods cast different weights better or worse, so if you are finding you are not getting any great distance in a cast, try a different rod. For example, a heavy sea rod is no good for casting light flies, similarly, the fly rod will not cast a heavy sea rod very far either.
Changing bait
To change your current hookbait of the rod that you are holding or to change loosefeed or groundbait, press the C key on the keyboard, a screen similar to below will be displayed :

This shows your current hookbait, current loosefeed selection and current groundbait selection ( top to bottom ). You can change each by using the arrow keys to the right and left of each bait box, these will scroll through the bait boxes you filled before going fishing on the tackle screens.
Some hookbaits can be attached in different ways, either directly onto the hook, or via a hair. The small hook icons on the top right, will set how you want to attach the bait, by clicking on the checkbox, ( top=hook, bottom=hair ), you set this. Also, some baits come in different sizes, for example, luncheon meat, the size scroll bar arrows can be used to select the size of bait you want to use. When the green bar is full, it indicates you are using the biggest size available, when it is low, it means you are using the smallest bait.
On top of this you can also, with some baits, adjust the quantity on the hook, this is done by moving the arrows next to the qty box, the blocks indicate how many pieces of bait are placed onto the hook.
The type and quantity of loosefeed and groundbait can also be altered in the same way.
Quick strike
When you get a bite, you should strike, sometimes this isn't necessary as fish occasionally hook themselves, but it is recommended you strike on each bite. There are two ways of doing this, you can either pull the mouse back sharply, lifting the rod ( make sure you have the balearm on ), or press the Z key, which will do the same. If using the mouse, it is recommended you press the left mouse button at the same time you pull the mouse back, this will ensure that the balearm on the reel gets flicked on, when you strike. After striking, if the fish is hooked, a landing net will automatically appear at your feet, to enable you to play the fish into it. Remember you will always strike on the rod that you are holding, ensure that you are holding the rod with the bite before striking.
Toggle balearm
The B key on the keyboard can be used to flick the balearm on the reel on and off for the rod that you are currently holding. With the balearm off, line can run freely from the reel, but with it on, this will stop the line. The current state of the balearm is shown in the top left / top right of the screen for each rod you are fishing with.
Scroll peg
Some pegs images and areas are too large to fit onto the display screen, so you can scroll right and left to view different areas of the peg using the right arrow and left arrow on the keyboard. Also, some pegs, like Verdisolle allow for full 360 panoramic rotation.
Change tackle
To change the tackle press the T key on the keyboard, Note, when fishing you cannot change the contents of any of the bait boxes, this has to be done prior to going fishing. The tackle will change for the rod that is currently being held, although the rod one and rod two buttons on the tackle screen can be used to alter the setup of either rod.
Groundbaiting and loosefeed
To catapult a ball of groundbait into the water, press the G key on the keyboard, to throw a handful of feed into the water, press the L key. From there both work identically, you will see a green crosshair, position this crosshair to where you want to catapult or throw to, and press the RIGHT mouse button. If the crosshair changes red, it is indicating it is currently not over water, but land. Be careful with the use of groundbait and loosefeed, too much can definately kill a swim, used right though it definately will improve the fishing in the area. Little and often is the best way of using it.
Minimise fishsim 2
Fishing by a bankside in real life is one of lifes greatest pleasures, and a lot of enjoyment is gained not from catching fish, but just being out in the wild enjoying the surrounding countryside. Of course, this can never be recreated in a computer simulation, but fishsim 2 allows you to do other things as well whilst waiting for a bite from that monster fish being targetted. At any time while fishing you can press the M key on the keyboard to minimise fishsim 2 and give you access to the desktop and the computer. When a bite comes, the fishsim 2 icon in the taskbar will flash and you can click on it to continue to strike and reel in the fish. This makes it possible to use your computer and fish at the same time !!
Note to users of windows XP
The multi-tasking in windows XP, is not brilliant, and you may find your other programs run too slow with fishsim minimised. Fishsim will grab whatever computer resources it can, and does a pretty good job of it as well. To solve this and make the other programs run better, press the CTRL+ALT+DELETE buttons with fishsim 2 minimised, select the processes tab from the screen that appears and find fishsim2.exe in the list. RIGHT click with the mouse on fishsim2.exe and from the drop down menu select Set priority -> Below Normal. This tells windows XP to treat fishsim 2 as a second class citizen, so to speak, and let other running programs get the lions share of the processing. Windows 95, 98 and ME users do not have this problem as they clearly use a different multitasking method.
Leave the bankside
To leave a session, press the ESC key on the keyboard, this will first display the contents of your keepnet ( if you have caught any fish - see view keepnet contents below ), and then return back to the main menu ( or the clubhouse if online fishing ).
Change rod being held
When fishing with two rods, only one rod can be held at a time, the other rod is always placed on the rod rests. To change the rod you are currently holding, press the SPACE bar on the keyboard, you will see the small hand change to the other rod, or the angler image change if you have it enabled. This rod is now being controlled, and all actions, mouse, changing bait, striking etc, will be performed on this rod. You can toggle back to the other rod at any time by pressing the SPACE bar again.
Turning effects on and off
The keys F2, F3, F4, F5, and F6 can be used to turn different effects on and off. There is a better description of the function of these later on this manual page, the table below gives a brief summary of what each does though.
Key Description F2 Water ripple effect on/off F3 Light effects on/off F4 Weather effects on/off F5 Blending effects on/off F6 Angler image on/off
These options are really for optimisation and personal preferrence. There are other options for the other F keys, but these aren't supported and only intended for use by people who create venue addons.
Putting rods on the rest
To place the current rod being held on the rod rest, press the left CTRL key on the keyboard. This will lock the rod horizontally to the water surface ( apart from sea venues ), and to move it from the rests will need a small jerk on the mouse to free it. This is to avoid accidental knocks on the mouse moving it off the rest. Also, when you change the rod you are holding, the rod not being held, will always automatically be placed on the rod rests.
Putting a rod on the rest is of most importance when ledgering and using a bite alarm or bobbin, as this will activate them ready for use. While the rods are on the rest, you can still reel in, let line out, adjust the balearm etc..
View keepnet contents
To view the contents of the keepnet at any time when fishing, press the Enter / Return key ( the key above the right shift key and below the backspace key ). This will only work if you have at least one fish in the net, if not, pressing the key will have no effect. When viewing the contents of the keepnet, the fish will be displayed in order caught, and you can click on any individual fish listed to see exactly where it was caught on the peg. The view all button will display the peg image with small flags showing you exactly where every fish in the net was caught.
Adjust reel speed
Some reels come with adjustable speed settings, to allow you alter the speed the reel brings line in or even lets it out in the case of some reels. There are a few sliding bars at the top left / top right of the screen which indicate various things ( below ) :
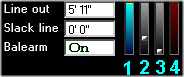
The one labelled (3) indicates the current reel speed setting, if this block is at the bottom, you have it on the fastest setting, if it is at the top you have it on the slowest setting.
To adjust the reel speed while fishing press the [ and ] buttons on the keyboard.
Although out of place, the desciptions below, show what the other bars mean,
Bar 1 : This is shows you the position of the lowest piece of tackle on the rig in the water, normally this is the bait. Imagine looking through a cross section of the water you are fishing, with the light blue on the bar being the water surface and the dark blue being the lake bottom. The small yellow line indicates the position where the lowest piece of tackle on the rig is positioned. If it is near the top, it is currently high in the water, near the bottom, it is deep in the water.
Bar 2 : This is the drag setting ( see below ), when the bar is positioned at the bottom, no line will come from the reel, when it is positioned at the top, line will be easily pulled from the reel by a fighting fish, even with the balearm on.
Bar 3 : The reel speed indicator as just described above
Bar 4 : This is black when there isn't a fish on the hook, however, when playing a fish, it is difficult to get a feel for exactly how much pressure that fish is putting on the line, this indicator shows that. The more pressure, the more red in colour it will be.
Adjusting the reel drag
This can be done with the UP and DOWN arrows on the keyboard, the nature of the fighting fish on a lot of venues is extremely strong, so it is recommended that this be set to the bottom to stop line coming off, otherwise you could find yourself having a lot of line to reel back in.
Auto-reel
The auto-reel feature is available on some reels and although not realistic it does save you sitting there with your finger on the left mouse button when spinning. You can activate and de-activate it by pressing the A key on the keyboard, the reel will then start to reel slowly automatically, you can use the rod position to alter the depth of the lure in the water, or the reel speed settings to speed up or slow down the retrieve.
Switch rods
With two rods being available, and one rod being used for ledgering only, there may come times when you need your second ledger rod on the left hand side of the peg instead of the right. To do this press the S key to switch the positions of the rods. Note the rod tips will stay as close as possible to there original positions to avoid any pulling on the line.
Hooking bites
There are many different bite patterns in fishing simulator 2, to describe each would take a bigger page than this, these patterns are produced by different species of fish nibbling at the bait in different ways, and are dictated not only by the species, but also by the different bait properties, and tackle set up. Over time, you will be able to recognise each pattern and make an accurate guess at the type of fish biting. Lift bites on the float are also possible depending on how you set the tackle up, so don't assume a float has to submerge everytime. In fact some bites from shy biting species may not even move the float or detector at all. The best policy though is to wait for the float to submerge or a strong pull on the ledger detector to strike.
With floating baits and takes on a floating fly, you will see a splash as the fish takes the bait, do not strike on the initial splash, but wait a split second, then strike.
Bites on lures are often violent, and will cause the rod tip to bend round, the best bet here is to strike straight away.
Reeling in a hooked fish
Once a fish is hooked, a landing net will appear at the bottom of the screen, it is now your job to bring that fish from the water to the net. In some cases with small fish, this will be a pretty easy job, but with bigger fish, quite a fight and battle can ensue. If you find with extremely big fish, you are not making much headway, try pumping the rod by lowering the rod, reeling and lifting it again. At all times always try to keep the line tight, as soon as the line slackens there is a chance a fish could free itself from the hook. Don't bully fish on light line, this will result in line snapping for sure, gentle movements countering the fishes efforts are the best way to go, be very careful around the landing net as well, this is the time, when most fish will snap you. The drag on most reels in FS2 isn't brilliant, so only use it when absolutely necessary.
If fishing for fish with teeth, pike etc, use a wire trace, otherwise you could find yourself snapping quite often.
Record catches
Fishing Simulator 2 keeps a track of all fish caught so you can check back to see what the biggest fish of each species has been caught on your computer. You can access these records from the main menu by clicking on the Record catches button. As well as all-time record, fishing simulator 2 keeps track of personal, venue and even peg records on your computer.
All time records
This list is shown when you click on the record catches button on the main menu, and is a list of the biggest of each species caught by anyone on your computer on any venue. Note, the "global" button is no longer active, and was removed due to inconsistencies on network servers.
When you click on the record catches button, each species will be listed, you can use the arrows to scroll up and down the list to see species that aren't displayed. Also, you can find out more information on each record by clicking on the species name. This will show a new screen, with details of where the fish was caught and the bait used. It will also show you how many of that species has been caught and the average size.
Personal records
Personal record catches are accessed from the memberships screen, select a member by clicking on the members name in the list, then click the records button. Like all time records a list of the records that member has caught will be displayed along with the venue and peg where they caught them. You can also click on each species to find out more information on the catch. Note the number of fish caught and average size of each species will only take into account the fish caught by the selected member.
Venue records
Venue record catches are record catches caught on all pegs on the selected venue. They can be accessed by clicking on the small peg image on the go fishing screen, and then clicking the venue records button. On this page, you will see the same information and have the same options as the other record catch pages as well as two extra ones ( latest FS version only ). These two extra options are Submit and Reset.
The submit button allows you to submit the records for the venue for a comparision to the Internet global records . If any of your catches are records for the venue, or even all time records, they will be included on the pages after clicking the submit button. You must be connected to the internet to do this and have your firewall setup correctly or disabled.
The reset button, allows you to clear the venue and peg records for the selected venue in one go. This is handy if for example, you have caught fish on a version lower than 2.10 that will not submit to the records pages. By clearing the venue and peg records, you can start a fresh and all fish caught will be accepted.
Peg records
To access the record catches for an individual peg, click the go fishing button from the main menu, select the venue and peg you want to view records for and then click the peg image, followed by the peg records button.
Fishing Simulator 2 options
There are various customisable options available in fishing simulator 2 to suit many tastes and preferences. From the main menu click the Options button which will list extra options available. There are five categories,
- Display
- Sounds
- Control
- Advanced
- Editor
Display options allow you to change the display by turning effects on and off. This helps with both personal preference and optimisation.
Sound options allow you to turn different sounds effects on and off to suit your preference.
Control options let you choose and set up your desired method of control as well as customise keyboard controls for the game.
Advanced options allow you to import addons and remove venues that are no longer required. Out of the two, importing addons will be the most commonly used.
Editor, this option is reserved purely for people who create there own venues in Fishsim 2, for more information you should consult the creators manuals.
To access each option, click on the tab at the top of the options screen, each is described in a bit more detail below :
Display options
Water effects control whether or not the water surface will ripple, the effect is set up on a peg by peg basis by the creator, however, if you don't like the water effects or find them distracting you can turn all of them off with this option.
Light effects, with these turned on, Fishsim becomes a lot more realistic in that at night time, the screen will be pretty dark. This means to fish with a float for example, is hard, and you will have to use a night or flouresent float to see it. If you don't like fishing in the dark, you can turn this effect off.
Weather effects control whether or not, things like rain, sleet or snow are displayed on the screen when fishing in these conditions.
Blending effects, these are recommended to be turned on. They will make the line look more realistic and not "fat" like rope, however the processing required to do this is quite intensive and if you are running FS2 on a slow processor, you may wish to turn these effects off to improve the overall game speed.
Scroll speed, lets you set how fast or how slow peg images will scroll from right to left / left to right. This is a slider setting, with it set to the far right, scrolling will be fast, to the far left, scrolling slower.
Light update, lighting updates in FS2 are very processor intensive, so if you are running on a slow PC, you may want to have these set to update not as frequently. A setting on the slider to the far right tells fishsim never to update the light on the display, a setting to the far left means the light will be updated frequently.
Display angler, the angler in Fishsim 2 is just a bitmap static image, but you can have it displayed to show which rod is currently being held instead of the small hand graphic. This setting determines if the angler is displayed or not.
Post it tips, when you first run fishing simulator 2, you will get the choice of having yellow post it tips to guide you through the game, however, this is the only time you will be offered the choice. This setting lets you turn them on again.
Sound options
Ambient sounds, these are background sounds, birds singing, water flowing etc, and can be turned off and on with this option.
Tackle sounds, the sounds in this category include reel sounds, bite alarms etc, and can be turned on or off with this option
Bite warning, a bite warning sound can be set to indicate when you are about to receive a bite, not realistic, so if you are a pureist, you can turn this off, otherwise set it to on.
Help sounds, these are sounds that are played on help pages, like page flicking sounds etc and can be turned off or on with this option
Control options
The controls in Fishing Simulator 2 are fully customisable and there are quite a lot of them to get to grips with initially, however with time, they come as second nature.
Fishing Simulator 2 will accept control from three devices : mouse, keyboard and joystick. You do not have to use each exclusively, they can be combined, however rod control is reserved for either the mouse ( recommended default ), or joystick. You can assign any of the mouse buttons, joystick buttons or keys on the keyboard to perform any action easily.
To access the control options in fishing simulator 2, select options then control from the main menu within the game.
Configuring the mouse
In the rare event the mouse is too sensitive in controlling the rod, you can adjust the sensitivity slighty to slow the motion down a bit, by clicking on the arrows on the configure mouse option, this will move the slider left and right. The default setting is to the far right where the mouse will be most responsive and sensitve. To the far left, the mouse will be less sensitive and responsive, the difference is hardly noticable on most mice though.
Configuring the joystick
Although the mouse is the preferred device for controlling the rod, there is an option to use a joystick for this, although it is in many opinions an inferior method to the mouse. All joysticks are slightly different so they will need to be setup accordingly within fishsim2. You can adjust the sensitivity and the "dead zone" of the joystick within fishing simulator 2, by clicking on the configure joystick button. The dead zone is the area around the central position of the joystick in which the stick can be moved without causing the rod to move. For very loose joysticks, this is best set to a high value, for stiff joysticks use a lower value.
The sensitivity bar is used to control how sensitive the rod is to the joystick movement, this setting is down to both the joystick and personal preference.
To set the joystick as the rod controller instead of the default mouse control, you will need to click the joystick button to on, this will allow the joystick to control the rod, however, the mouse is still used for all other options ( eg buttons on screens ).
When using the joystick you must also ensure that it is configured correctly in the windows control panel.
Customising controls
All the controls in fishing simulator 2 are easily definable, to enable you to customise them to your personal preference, via the configure controls button. You can define each action to either a mouse button, key on the keyboard or joystick button, or a combination of all three if you wish. For example, you can have the left mouse button set to reel in, the B key on the keyboard to toggle the balearm, and a joystick button to strike. You must have at least one control defined for each though.
When you access the configure controls screen, you will see a list of all the actions that can have a button or key assigned to them, by moving the mouse cursor over each of these actions will highlight it. With the action highlighted, you can then either click a mouse button, press a joystick button, or a key on the keyboard to assign a control to it. As you do this, you will see the screen change to show the new selection.
If you get in a mess and want to restore the default controls quickly, there is a default button at the bottom of the screen to automatically set the default back.
Advanced options
These options allow you to do more advanced tasks, like import addons and delete venues. Out of the two options, importing addons is definately the most useful and one in which you'll need to be familiar with to extend Fishing Simulator 2 to include extra tackle, bait, fish species and venues to fish. Both options can be found by clicking on the advanced tab on the fishsim 2 options screen.
Importing addons
There are two ways in which you can find addons
- On the CD ROM
- Downloaded from the Internet
Out of the two, the CD ROM addons are the easiest to import, but there are plenty more available on the Internet than on the CD ROM, plus this number grows almost daily.
To import an addon from the CD ROM, you will need the CD ROM in the drive. When inserting the fishing simulator 2 CD ROM into the drive it will try to install itself again, you do not need to do this, and can click the exit setup button to stop this happening.
With the CD ROM in the drive, you can then start up fishing simulator 2 and select the Import addon button from the options, you will then see a list appear. Then click the button CD ROM at the bottom of the page, this will then list all the addons available on the CD ROM that you can import. You can use the scroll bar to scroll through the list.
By clicking on each addon filename, it will give you a brief description of what the addon is, and ask if you want to import it ( yes or no ), if you click Yes the addon will be imported, and you will be told, that you need to restart fishing simulator for the addon to appear. NOTE : You do not have to restart after importing every addon, you can import as many as you like, and then do one restart.
Once an addon has been imported it is there forever, and doesn't need to be re-imported again. After importing an or some addons, and restarting fishing simulator 2, the new addons will then appear, these may be extra baits, tackle, species, or venues to fish.
To import a downloaded addon, is the same process as the CD ROM, apart from there is normally some preparation to do in downloading the addon from the Internet and "unzipping" it. There is an excellent tutorial on this written by Derek Shaw www.fishsim.net/downven.htm
Deleting venues
There is very little use for this feature, unless you want to delete venues quickly so that they don't appear in the venue lists. This option will not delete all the files for the venue either, just a single file to stop it appearing on the drop down list in FS2. This option is not recommended to be used without guidance.
On pressing the delete venue button, you will be asked if you want to delete the current venue selected, if you choose yes, the effects are non-reversable. Fishsim will also close down and need to be restarted as well.
If you do need to delete a venue, it is not recommended that this option be used, instead you should contact the creator of the venue for instructions on how to remove it.
Peg editor
The peg editor button is only used by creators of venues in fishing simulator 2 and should only be used in this instance. In many cases the button will not work, for more information on the peg editor, see the creators documentation on fishsim.net.
Fishing Simulator 2 library
This can be accessed by pressing the Library button on the main menu. Addons can be created containing information books that will be placed in the library and included in the list that is displayed. To read one of the books, click on the name in the list.
Note : This manual supercedes the fishsim 2 manual in the library.
( c ) J.C.Spooner 2003
FS3 Options :
- Home
- Download
- Latest update
- Addon content
- Record catches
- Challenges
- Game manual