Creating venues for Fishing Simulator II
J.C.Spooner 2002

Introduction
One of the strongest features of Fishing Simulator is the ability to expand the simulation with the addition of new tackle, baits, fish species and venues. Fishing Simulator II has retained and enhanced this original version one feature, ensuring that it grows and develops even further than version one.

A "venue" in Fishing Simulator is a collection of "pegs", which in turn are places to fish. Pegs are sometimes commonly referred to as swims, spots, or holes. A venue therefore is a body of water, such as a lake or river. The term venue can also refer to a collection of geographically close waters. Around the venue are located "pegs", where anglers can fish from.

The majority of venues in version one, are real places, and where possible, the fishing conditions have been re-created as close as possible to the real thing. When version one was released, there were just three venues, Packmoor Waterways, May Valley and Hanley Park. Of these, only Hanley park was a real life venue. These three venues in turn gave the fishsim angler a choice of 26 totally different pegs to fish from. This number isn't bad for any fishing simulator, however now there are probably in excess of 400 different pegs in the fishsim world. The reason this number has grown so dramatically, is down to the program having the ability to expand and evolve, combined with an enthusiasm from the fishsim users to create and fish more diverse venues. The number of different pegs in Fishing Simulator II will exceed even that of version one.

Creating a venue in version one though is by no means easy, and requires a knowledge of PC's, Windows, and image manipulation, as well as a lot of testing. It is because of this, venue creation in Fishsim II has been made slightly simpler, and there are plans to make it simpler still, with the creation of various tools.

This page describes in detail the process of venue creation in Fishsim II, although a similar knowledge level is required to version one.

Tools and knowledge required
The following briefly describes what you will need to create a venue in Fishsim II

- A knowledge of files and folders in Microsoft Windows operating systems.
- A copy of Fishing Simulator II.
- A simple text editor, Microsoft Notepad, that comes with Windows is ideal.
- A paint editing package, capable of resizing and editing JPG images - Paint Shop Pro is a good choice ( Note : not photoshop )
- Time : around 30 minutes per peg, depending on how much detail you want to add.
- A basic knowledge of fish habitat requirements.

Storage of venues
This section describes what files fishing simulator looks for to find different venues.

Inside the Fishing Simulator folder on the hard disk, there is a folder called VENUES. Opening this folder will reveal a selection of files with .ven extensions. Each file with a .ven extension contains information about a single venue. When Fishing Simulator loads, it inspects all the files in this folder with a .ven extension, to decide how many and what venues are installed. To create a new venue you will need to create a new file with a .ven extension, and add it to the VENUES folder.

Even though the venue files have a .ven extension, they are still stored in standard ASCII text format, and can be created or edited* with a simple text editor program like Windows Notepad.

* In most circumstances venue files with a .ven extension created by someone else, will be stored in a scrambled binary format. These files can only be edited by the person who created the venue to prevent changes being made to gain a competetive advantage.

Creating venue folders
Below is a two-step process to creating the required folders for a Fishsim II venue.

Step one - Create a folder to store the new venue files

The first thing you will need to do is locate and open the VENUES folder inside the Fishing Simulator folder. To do this you can use either the My Computer icon on the desktop, or Windows Explorer to examine the contents of your hard disk drive.

Inside the VENUES folder, position the cursor in the folder ( not over an icon ), and press the right mouse button. A drop down menu will appear, select the New -> Folder option, from the menu.

A new yellow folder will now have been created inside the VENUES folder. The name of the folder will probably be called New Folder and highlighted. Rename this to a short concise name, meaningful to the name of the venue you are creating. Don't use spaces in the name, as fishsim will not recognise folder names with spaces, even though Windows does. For example, if you were creating the Packmoor venue, you could call the folder PKMOOR.

This new folder will be used to store all the files required for the venue. You will need to remember the name of this folder, for the next step. For the remainder of this page, it will be assumed that Packmoor is being used as an example in a folder named PKMOOR. The venue you will be creating will have a different folder name, so in the following descriptions, replace the PKMOOR with the name of the folder given for your venue.

Step two - Create further folders, inside the venue folder

With a new folder created, you now need to double click with the left mouse button on the new folder to open it. When it opens, it will be blank, and contain no other folders or files.

Inside the new folder, use the same method described above ( right-click, new>folder ), to create three more folders and name them : DATA, IMAGES, and PEGS.

There will need to be further folders created later, however these are okay for now.

The DATA folder will be used by Fishsim to store any data files for the venue, this should normally be left empty.

The IMAGES folder will hold the images for all the pegs on the venue.

The PEGS folder will be used to hold the fish stocks for each peg.

Creating a .ven file for the new venue
Creating a .ven file involves a knowledge of the file format of fishsim files. If you have edited version one files, this should be familiar, and the first part below, can be skipped. The second part contains detailed information on what each section and variable does.

Format of Fishsim text files

Most of the text files in Fishing Simulator are stored in the same format. It's a format that's very similar to the .ini file format, commonly used in Windows. There are three portions to the file :

- Sections : Shown with the name in [square brackets]
- Variables : Contained within sections, an = follows a variable name on the same line
- Values : These are to the right hand side of the = sign after the variable name.

In short, the format of the files are split into [sections], which in turn have variables, with thier associated values

Creating a new .ven file

Like the previous stage, locate the VENUES folder in the Fishing Simulator folder. Position the mouse inside the folder ( not over an icon ), and click the right mouse button. A drop down menu will appear like before. This time select the New->Text Document option from the drop down menu. An icon ( probably similar to a small writing pad ) will appear, with the name New text document.txt highlighted. Rename this name to something meaninful for your venue, with a .ven extension. For example, if you were creating the Packmoor waterways venue, you could use pkmoor.ven. Try to keep the name concise, and like the folder names, containing no spaces. You may get a message from Windows warning that changing the name may make the file "unusable", this is okay, just click yes to continue anyway.

With the file created, double click on it with the left mouse button to open it. You may recieve a Windows dialog, titled "Open With..". If you do, locate Notepad from the "Choose program you want to use" list. You may need to scroll down to find Notepad.

The file will now open in Windows Notepad, and will appear blank. It's now ready to be filled in with details of the new venue you are creating.

Format of the .ven files

The easiest way to describe the required sections and variables in the .ven files, is to show an example. There is one below, for the River Lot venue.

[DETAILS]
Name = River Lot
Ref = LOT
Desc = venues/lot/fsb/page1.fsb
Dir = venues/lot/*.peg
LastPeg = venues/lot/last.dat
Creator = Teresa Morris
Date = 24 September 2000
Records = venues/lot/
Level = 1.0
Regcode = 786868

[WEATHER]
Weather = data/ukwthr.dat
LookUp = venues/lot/temps.dat
TempModel = 1
TempFact = 1
StartTemp = 14

The first line shows a section called [DETAILS]. This section contains various variables and values that are specific for the venue being created.

The Name variable, contains the name of the venue that is being created. Ideally this should be kept as short as possible because of the screen limitations within Fishsim II, especially on the record catches page. It can contain spaces. The name should as far as possible be kept unique throughout all the venues created for Fishsim II.

The Ref variable, should be set to a unique reference name for the venue. This should be unique throughout all venues created for Fishsim II. It should be no more than 9 characters long.

The Desc line is optional, and it can be used to supply page or set of useful information pages on your venue. Information pages are in the form of fsb files, more information on creating them can be found by clicking here. Where this comes in FS2 is just before you go fishing, and click on the small peg image for more information. One of the options there is Venue info, when the user presses this button, Fishsim 2 checks for a DESC line in the .ven file, if one is there, it displays the fsb file it is set to.

The value of the Dir variable tells Fishsim II, where and which files to look for that define each of the pegs on the venue. It should be stated as a relative path from the Fishing Simulator folder. The example above tells Fishsim II to look in the venues/lot/ folder for all the files with a .peg extension ( indicated by * . peg ). Assuming, we are creating the Packmoor venue, the folder created in the last step, PKMOOR, will be specified to give a Dir variable value of : venues/pkmoor/*.peg. Peg files are covered later.

The LastPeg variable holds a path and filename that is used by Fishsim II to store the last peg the user accessed on the venue. This file will be created automatically by Fishsim II when the user access the venue. Assuming Packmoor is being created again, this variable would contain the value : venues/pkmoor/last.dat

The Creator variable should contain your name. It can be any length of characters long, and contain spaces. This value is used for display purposes only, so can be anything, but it is advised it is kept short to avoid text overlap within the program.

The Date variable should contain the date the venue was created. It can be entered in any format you like and contain spaces. This value is used for display purposes only, so can be set to anything, but it is advised that it be kept short to avoid text overlap within the program.

The Records variable contains a relative path from the Fishing Simulator folder. It tells Fishsim the folder to store the record catch files associated with the venue. Again, assuming the Packmoor venue is being created, this value should be set to : venues/pkmoor/ ( Note that it does have a trailing forward slash on the end ).

The Level line can be used to set the level of the venue. 1.0 is the easiest level for a venue, whereas 5.0 is the hardest. The levels should be set in 0.1 graduations, eg 1.0, 1.1, 1.2, 1.3 etc.. The best way of doing this, is to set a level of say 2.5, then if the venue fishes too well, increase it, or if it fishes too poor, decrease it. Eventually you can settle on the right level for the venue.

The Regcode line has to be entered, otherwise your venues will be set a ridiculously hard level, and possibly contain no fish. You should enter the value 786868 here.

Optional lines that can be added to the [Details] section

There are a few optional lines in the [Details] section that can be added, some of these were introduced in version 2.08, and if used, will be ignored by previous versions of Fishing Simulator 2, so this ensures that your venue will work on earlier versions safely, allbeit with the record catch checksums different.

TimeInc - You can now create venues where the clock moves faster ( or slower, I suppose ) by a given factor. This example, has the clock moving at 10 times faster than the normal speed, so every second in real time will be 10 seconds on the clock. This means that the weather and light will change a lot faster, for the duration of someones session on the venue and mean that they will have to re-adjust there tactics more over the course of a session. This doesn't affect match timing, so if the duration of a match is set to an hour on the venue, that will be an hour real time still, although the clock will have advanced 10 times that by the end of the match. Traditional fishing matches don't last for an hour, a lot stretch for a few hours, and whole days, this can be simulated now, without having to sit by the PC fishing for all the time.

VenBaitMul - This is a random floating point value that can be anything you like and it directly impacts on the bait popularity values for all the shoals in the venue. It may seem pointless to have it here, but the reason is two-fold. The main one being, that before it was possible to replace a scrambled .ven file with an unscrambled text .ven file for the same venue. This opened up the F11 function and displayed the baitpop values for all the shoals on the venue. This cannot be done now, as the person creating the alternative unscrambled .ven file will not know what value has been specified in this line. The second reason, although not so important, is that a creator can change this value to jig the bait pops around a bit.

Pegbaitdif - This can be set to either 0 or 1 (default). If set to 0, a shoal of fish placed ( in the same quantity ) into another peg on the venue will have the same bait pop values on both pegs.

MaxBait - This line can be used to specify the maximum bait pop value that you are prepared to allow for all the stocks with all the baits on a venue. If this is set to 100, then no shoal will have a bait pop value greater than 100 for any bait. If it is greater than 100, it will be capped down to 100. This capping occurs after the BaitFact calculation ( next ) - Note this doesn't apply to groundbait, flies, or lures, just hook or hair-rigged baits and loosefeed.

BaitFact - A floating point value can be specified to apply a factor to the bait pop values on all the shoals with all the baits on the peg. If this value is 0.5 then all bait pop values on the venue will be halved, 0.25 quatered etc, a value of 2.0 will double them. Note this doesn't apply to groundbait, flies, or lures, just hook or hair-rigged baits and loosefeed. A value of 0.0 will effectively make every bait useless, which may be desireable if you are planning on making fly fishing venues and do not want to allow baits or loosefeed to be allowed.

ShoalSpook - This is a bit of an artificial factor but there if anyone wants to use it. The value specified is a whole number, and represents the number of seconds ( real time ) that it takes a shoal to recover after one of it's members has been caught or lost in battle. While a shoal is in recovery, the fish in that shoal can still be caught, however, the shorter the period of time between the shoals disturbance and bait being presented to them again, the lesser the chances of the shoal taking the bait. At the end of the specified recovery time, they'll be behaving as normal again. So for example, if this value is set at 100, if 50 seconds have elapsed between the last disturbance of the shoal, you can assume the fish in the shoal will be half as willing as before to take the bait. After 100 seconds, they'll be back to normal again. This can't be set on an individual shoal basis, it has to be set to the same for all the shoals on the venue. It's a crude but effective way of limiting catches though, if that's what is required. Note all time calculations are made real time, and do not take into account the TimeInc value is there is one other than 1.0 set.

Baitpopcond - This can be added to the details section with a setting of either 0 ( default ) or a whole number value between 1 and 10. If set to a value higher than 0, this makes the baitpop values for all shoals on the venue, change according to conditions and area casted, a lower setting ( apart from 0 ) will force the fish to change there preferences more often. The values displayed on the F11 screen will still be the same, and will give a rough guide, but not an accurate one with this setting. It is impossible to know what baits are good with what shoals when this is set, as it is calculated at runtime and uses things like area casted, time of day, temperature, etc to alter the baitpop values for each shoal. These change throughout the duration of a session so fish shoals will change there eating habits on a more dynamic basis, forcing the angler to make changes accordingly.

The next section [WEATHER] holds variables which define the weather and water temperatures for all the pegs on the venue.

The Weather variable holds the path and filename of a weather definition file for the venue. A weather definition file contains information on climate and different weather patterns in different areas. Creating weather definition files is covered on this page, however in most cases this may not be necessary as there are some pre-defined weather definition files already available. It is strongly advised that you use a pre-defined weather definition file, instead of creating one yourself, if the weather file doesn't come pre-installed on the CD ROM, then you will have to either, explicitly inform anyone downloading your venue that the file is required, or add it to your distribution JR2.

The LookUp variable, again contains another path and filename of a file that will hold look up information on water temperature. You do not need to create or distribute this file with a created venue, as Fishsim II will automatically create it. This occurs in Fishsim II, when a message appears the first time a venue is fished. The weather and temperature patterns in Fishsim II are complex, the water temperature is monitored every 60 seconds, at 1 cm depth intervals to provide an accurate reflection of conditions. The temperature of the water at any depth could be affected by the air temperature, hours, days, even weeks before. It is not possible for Fishsim II to calculate this degree of accuracy "on the fly" while fishing, so a look up table is generated for faster calculation. The file specified in the LookUp variable holds this lookup information. Assuming the Packmoor venue is being created, this variable would contain : venues/pkmoor/temps.dat.

The TempModel variable holds a value that tells Fishsim II what type of venue is being created and the water temperature model that should be used. There are 6 choices, the list below shows which setting to use, based on the venue you are creating :

1 = Typical medium depth lake
2 = Large lake / loch
3 = Slow flowing river or small pond
4 = Medium flowing river
5 = Fast flowing river
6 = Very large deep lake or sea venue

The TempFact variable can be used to artificially raise or lower the temperature of the water, based on the turbidity ( murkiness ) of the water. Murky water venues are generally warmer than clear water venues, and contain less dissolved oxygen. This can be reflected with a TempFact setting above 1.0, typically not more than 1.5. A very clear water venue should contain a value less than 1.0, normally not less than 0.5. In short, if the venue you are creating is murky, or you want to artificially increase the overall water temperature, set this value between 1.0 and 1.5. A clear water venue, or a venue in which you want to artificially decrease the overall water temperature, you should set the value between 1.0 and 0.5. A setting of 1.0 can be considered average. Bear in mind that artificially increasing or decreasing the water temperature directly affects the oxygen retention of the water. Raising the temperature reduces the oxygen retention of the water, lower the temperature, increases the oxygen retention. There are lots of other factors that affect water temperature and oxygen levels on top of this, but none that affect them on such a large scale. Adding plant life to venues for example ( later on ), will increase the oxygen content of the water in the surrounding area in daylight hours, but decrease it in darkness, due to photo-synthesis occurring.

The StartTemp variable has little effect on the overall water temperature, and should ideally be set at 14 degrees. The reason it is included, is that when the temperature look up table is created, it goes back in time three years from the date the venue is fished for the first time. In doing so it sets the whole water temperature at all levels to this starting temperature, and then does a fast simulation of three years of time and weather. By the time this is done, the starting temperature has had a minimal effect on the overall temperature of the water ( probably less than 0.00005 of a degree ).

A HighTide line should be added to the [weather] section when creating sea venues. This line is used by Fishsim 2 to generate the tidal motion on the venue. It indicates to fishsim what time ( hour of the day ) the first high tide will be on the 1st of January 2001. This should be a value between 0 and 11, as between these hours of the day there has to be the first high tide. For example, a value of 9 indicates that on the first of January 2001, the first high tide will occur at 9am. In Fishing Simulator, there are two high tides and two low tides a day, each being 12 hours apart. So if the example above is used, with the first high tide being at 9 am, then low tide will be 6 hours later at 3pm, 6 hours after that there will be another high tide at 9 pm and so on..

With sea venues a TideInc line should also be added. This is used to set the tide time increments per day, in minutes. For example, if the hightide on the 1st Jan 2001 is set at 9am, then the tideinc is set at 45 mins, the first high tide on the 2nd of Jan will be at 9-45 am. On the third it will at 10-30am and so on. This calculation goes throughout the year, adding 45 minutes each day, or whatever is specified as the tideinc value.

The final value that should be added to the [weather] section for sea venues is the TideDev value. This specifies the tide deviation in inched. If this value is set to say 72 ( 6 ft ), then at high tide the water depths will be 6 ft deeper than at low tide. So if a peg has been created with an area of water 10 ft deep, this will be the depth at low tide, at high tide it will be 16 ft.

If you are creating a sea venue, more information on this can be found on this page

Optional line that can be added to the [Weather] section

Tempupdatemins - If this line is left out, then the water temperature will be calculated every hour ( 60 mins ), real time. This is the default, however with the algorithms for calculating temperature being quite processor intensive, and now there being more powerful processors available, it is feasible to have the water temperature calculations update on a more regular basis. Also the algorithms have been optimised more as well in version 2.08. Any value between 1 and 60 can be entered here, if 1 is entered the water temps will be recalculated every minute, this is a feasible option now and provides for faster changing conditions. Note all time calculations are made real time, and do not take into account the TimeInc value is there is one other than 1.0 set.

Notes on water temperature and weather calculations

The Weather, TempModel, TempFact and StartTemp variables are all used in defining the weather and temperature look up file. If these values are changed for any reason during the venue creation process and the temperature look up file has been generated, you should delete the temperature look up file and let Fishsim II recalculate it. This will occur the next time the venue is fished during testing.

Finishing off the .ven file

After this stage you should have a file with a .ven extension, which looks similar to the example shown above. This file now needs saving; choose File->Save from the menu bar in Notepad to save the changes made. You can come back and edit the file further at any time to make changes, however, if any of the weather variables are changed you should delete the temperature look up file.

After creating one venue, it is probably quicker to edit and change a previous .ven file and save it under a different filename with new values, but be careful to check over that you have changed everything correctly and not left any previous venue lines in there.

Peg Images
Fishing Simulator version one, became a little confused due to it's continual improvement over time. Initially, there was a DOS only version, which used 256 colour PCX images. The quality was acceptable, but not in the same league as the true colour JPG images there now are. Fishsim II also makes use of either JPG or PCX images, although it is expected that PCX files won't be used for peg images because of their file size compared to JPG's. As a result of the development of version 1, creating venues involved, converting them to PCX's and back to JPG's so that the DOS peg editor could be used. The peg editor in Fishsim II is contained within the Windows version, so there is now not a need for the PCX conversions.

On top of this, Fishsim version one could only have peg images of 640 x 480 pixels, whereas with version two peg images can be much wider because of the scroll feature. Please note that they still have to be 480 pixels deep though, vertical scrolling isn't implemented and wasn't deemed necessary.

Before embarking on creating a venue, it has been assumed that the peg images are available. Ideally these images should be 800 pixels wide or more, by 480 pixels deep. It is possible to have images less than 800 pixels, but they don't look so good on the fishing display, so not recommended. A resize operation in a painting package like Paint Shop Pro, can be used to make the images wider.

Finally on image sizes, the pixel width of the image must be exactly divisible by 4. For example, 800 pixels is fine because 4 goes into 800, 200 times, with no remainder. 850 pixel wide images are not valid because 840 / 4 = 212.5 and is not exactly divisible by 4. The height must be 480 pixels also. If the image is not divisible by 4, then it will appear skewed on the small image display prior to going fishing.

If you are planning on incorporating a rippling water effect into a peg, any foreground objects ( bushes, tress, bank etc.. ) should be removed and replaced with water.The rippling water effect however does not have to be added to a peg.

Once you have the images for each peg, at the correct size and in the correct format ( probably JPG ), these should all be stored in the IMAGES folder previously created in the VENUE/<pegname> folder. For example, if Packmoor is being created, this would be in the the IMAGES folder would be in the PKMOOR folder which is in the VENUES folder which is in the main Fishing Simulator folder. E.g.

VENUES/PKMOOR/IMAGES

Quick recap

At this point, a new venue has been created, along with temperature and weather information, and there is an image for each peg stored in the IMAGES folder for the venue. It's now time to create the pegs themselves.

Creating the pegs for a venue
Going back to version one again. The number of pegs a venue contains in version one is pretty much "set in stone" once the venue has been created. This problem has been solved with version 2, where new pegs can be added to a venue easily after the venue has been created. The information below explains the steps involved in adding pegs to a venue. Note that a venue must have at least one peg, otherwise the results in Fishsim II are unpredictable, and will probably result in a crash, when a user accesses the venue.

Creating the folders

You now know how many pegs you want to have on your venue, it will be the same as the number of images stored in the IMAGES folder. A folder to hold all the files for each peg will need to be created in the PEGS folder created earlier. These folders should be named PEG1, PEG2, PEG3 ... and so on for each peg in the venue. To do this locate the PEGS folder for the venue, right click with the mouse, select New->Folder etc.. like before.

Creating .peg files

In a previous step, "Creating a .ven file for the new venue", a variable was defined called Dir. Assuming again, it is Packmoor that is being created, this variable would have contained : venues/pkmoor/*.peg. This variable tells Fishsim II where to look for information on all the pegs for a venue. When the angler using Fishsim II selects a venue, Fishsim looks at the Dir variable to find out where to look for .peg files. It then scans the folder for .peg files, each one corresponds to a different peg on the venue.

.peg files are very similar to the .ven files described earlier. They are stored in exactly the same format and can be created in the same way.

To create a .peg file, create a new text document in the VENUES/<venue name> folder, for example, if the venue is Packmoor, this would be the VENUES/PKMOOR folder. Name the first peg file peg1.peg, the second peg2.peg and so on for all the pegs on the venue.

The contents of the .peg files are a bit longer than the .ven files, an example of the first peg on the Lot venue is shown below :

[DETAILS]
Name = Peg one
Ref = 5
Creator = Jason
Date = 24 December 2000
Desc = venues/lot/fsb/peg1.fsb


[FILES]
Image = venues/lot/images/peg1.jpg
Data = venues/lot/data/peg1.dat
Records = venues/lot/pegs/peg1/
Stocks = venues/lot/pegs/peg1/*.stk
Sounds = inf/gensound.ini
Fish = venues/lot/stocks/peg1/peg1.all
IncStk = 0


[Distance]
DPRatio = 1.00
XGrad = 5
YGrad = 5
Rotate = 0
XD = 30
YD = 0
RTop = 250
Orient = S


[Water]
PH = 7.00
O2 = 1.00
Turbid = 50.00
Saline = 0.00
Temp = 1.0


[Ripple]
On = 1
Frames = 50
YAdd = 200
XWave = 0
Damping = 100
Speed = 1
DivModWave = 100
YAddDiv = 0.7
Reverse = 0

The [DETAILS] section contains general information about the peg.

The Name variable holds the name you want to give to the peg. This can be any length, however, it should be kept as short as possible to ensure that it fits into the designated areas within Fishsim II. It can contain spaces, and should be unique on the venue.

The Ref variable holds a numeric value ( whole integer ). This isn't the peg number, but does indicate where the peg appears on the drop down box. A low number appears first in the peg lists, with a high number appear last. When creating a venue it is advisable to start the first peg ref off at 5, then the next peg as 10, and so on, incrementing by 5 each time. This way, it is easier to slot other pegs in between at a later time.

The Creator and Date variables are identical to the venue variables of the same name, and should be set to your name and the date the peg was created.

A Desc line can be added to the peg files to give a useful information page on the peg. Information pages are in the form of fsb files, more information on creating them can be found by clicking here. Where this comes in FS2 is just before you go fishing, and click on the small peg image for more information. One of the options there is Peg info, when the user presses this button, Fishsim 2 checks for a DESC line in the .peg file, if one is there, it displays the fsb file it is set to.

The [FILES] section contains information on all the files that are used by the peg.

The Image variable holds the full path and filename of the JPG or PCX image for the peg. This will be in the IMAGES folder created earlier, if the above steps have been followed.

The Data variable value should be set to contain the path and filename of a file to hold the pegs data ( depths, objects, flow etc.. ). The file does not need to be created, Fishsim II will do this automatically when the peg is edited ( see later ). Assuming the Packmoor venue is being created this variable should be set to venues/pkmoor/data/peg1.dat for peg 1, and venues/pkmoor/data/peg2.dat for peg 2 and so on.. If ever you need to scrub the depths objects and flow clean when creating a venue, deleting the file specified in this variable will do it.

The Records variable should contain a path name to a folder where the records for the peg are to be stored. Record catches are stored in four files, and must be stored in the correct peg folder. For example, again with Packmoor, peg 1 would have a value of venues/pkmoor/pegs/peg1/, peg 2 would contain venues/pkmoor/pegs/peg2/ and so on .. The record catch files will be created automatically by Fishsim 2, and called rec.rgh, rec.rlh, rec.rgv, rec.rlv.

The Stocks variable tells Fishsim 2, where to look for fish stocking information for the peg. Fish in Fishsim 2 are stocked in pegs, which is significantly different than version 1, which used probability algorithms to decide if a fish was present or not. Fish stocks are stored in .stk files, which are normal ASCII text format. They will be covered in the next section. Assuming Packmoor is being created, this variable would read : venues/pkmoor/pegs/peg1/*.stk for peg 1, venues/pkmoor/pegs/peg2/*.stk for peg 2 and so on ... The stocks line is now redudant, and not used, however it should still be included. Older beta versions of FS2 and some current versions still may make use of this method of stocking venues, but any new versions should use an .all file instead.

Ambient sound effects can be added on a peg by peg basis. This is achieved by using a Sounds line which points to a text file containing information about the ambient sound effects and sound files. There are two stock files to use, the inf/gensound.ini, which gives a set of countryside sound effects, or for sea venues you can use the inf/seasound.ini file. You can also create your own sound effects and sound files for venues, instead of using the default ones.

The Fish line provides a faster, more efficient and far better way to stock pegs, over the Stocks line above. More information on peg stocking can be found in the Stocking fish section below.

The IncStk line is also used with peg stocking, and more information can be found in the Stocking fish section below. It is recommended that this line be set to the 0 value, as a far easier method of stocking pegs is available using .all files.

There are three optional lines that can be added to the [Files] section of the peg files, these are Csound, CsoundVol and CsoundFreq. These three lines can be used to add a constant playing sound effect to a peg. This is useful for sea venues, where the surf crashes, or fast flowing river venues, where the constant sound of running water can be played over and over. An example of the lines that can be added for a sea venue is shown below. The Csound line sets the .wav file that will be played over and over. The CsoundVol line sets the volume the sound effect should be played at, use trial and error with different values to achieve the desired volume. The CsoundFreq line contains the frequency in Khz that the wav file should be played at. Normally this is set to the same as the frequency in the wav file itself, however, you can achieve different effects by altering this value. If you are including a sound file in a venue that isn't one contained in the main fishsim 2 download, then it should be distributed in the JR2 for the venue.

Csound = sounds/sea/surf.wav
CsoundVol = 10
CsoundFreq = 8000

The [DISTANCE] section holds important variables on a peg size, detail level, depth, and orientation.

The DPRatio ( Depth ratio ) variable can be used to create extremely deep pegs, or detailed shallow pegs. A setting of 1.0 means that depths of the peg can be set at 1 ft intervals, down to a maximum depth of 21 ft. A setting of 0.5 halve's these values, meaning depths can be specified in 6" intervals down to a maximum depth of 10' 6". A setting of 2.0 doubles the limits, therefore, each depth is specified in 2 ft intervals down to a maximum depth of 42 ft. Any depth ratio value can be used, even 10.0 if you want to create a venue with a total depth of over 200 ft ! This again is different to version one, where depths were always specified in 1 ft intervals, down to a maximum of 22 ft.

The XGrad and YGrad variables allow you to control the degree of accuracy the peg depths, objects and flow are specified. When using the peg editor in version one, each square that could be filled, was 5 x 5 pixels. Setting XGrad and YGrad both to 5, will give the same size definition areas as version one. There was no real problem here in version one, as this was accurate enough, however the detail level can now be left to the peg creator. A setting of 3 x 3 results in smaller grid squares in the peg editor, giving a greater degree of accuracy in defining the peg. A higher setting, results in less accuracy. There are implications in straying from the standard 5 x 5 grid, detailed defined pegs, will take up more disk space and take up more memory when fishing the peg in Fishsim 2. The size of the file pointed to by the Data variable can be examined to see how much size is taken up. Once a pegs depth, objects or flow have been defined, these values should not be changed. If they are the data file associated with the peg should be deleted and the peg re-defined in the peg editor.

The Rotate variable can either be set to 0 ( default ) or 1, to create pegs that have full 360 degree rotation, such as the verdisolle peg. If set to 1, the peg will be rotational, otherwise it will be scrollable. If you are creating rotational pegs, you will need to make sure that the far left and right side of the images match up with each other, otherwise it will look strange. On trick that can be used to do this is by using the Mirror effects in common paint packages, such as paint shop pro. You do this by mirroring the image and attaching the mirrored image to the right or left hand side of the orignal image.

The XD, YD, and RTOP variables are used to define the pegs perspective view and are quite complex. Version one hasn't got a distance perspective. This was one of the most critised parts of version one. Seemingly, in version one, you can cast great distances, and fish swim the length of a lake when hooked. This is not the case with version two, as the pegs are now defined as true 3 dimensional objects, with perspective viewing. For example, floats get small in size the further away from the angler they are. These three variables are responsible for this. They also are used by Fishsim 2 to calculate the surface area, and volume of water on a peg. The volume of water a peg contains will affect the stocking. For example, two identically sized images, with the same pixel fishing area could be created, one may be a small river the other a large loch. Fishsim 2, will calculate the volume of water accurately despite the pixel fishing area being the same. By placing a single fish in the small river, and the same fish in the large loch, will result in the fish being caught more often on the small river, than the loch. On a large body of water, it could be anywhere ! however on a small body of water, it hasn't got that many places to go.

Setting these values isn't easy, in brief though, the lower the values of XD adn RTOP the larger peg will be created. Raising these two values results in a smaller peg. The easiest way to see if you have the perspective right, is to fish the peg, and press the F9 key, that will bring up a perspective grid. To do this though, you will have first had to set the depth and features ( below ). When using the F9 key, and you need to make adjustments to the perspective, leave the fishing session with the escape key, minimise FS2 with the ALT-TAB combination ( note if on Windows XP, this will only work with version 2.08 or higher ). Then change these values in the .peg file and save it, restore FS2 from the taskbar, go fishing again, flick onto a different venue with the venue selector, then flick back to the venue you are creating, and go fishing again. This will force these values to be reloaded, without the need to restart FS2 each time you change anything.

The Orient variable is a lot simpler to explain.. This value indicates the polar direction the angler is facing when sitting at the peg. Valid values are N, NE, E, SE, S, SW, W, NW. Previously in Fishsim version one, the angler always faced Northerly. This meant a Southerly wind helped the cast on every peg. Now if the orientation of the peg is Southerly, and there's a Southerly wind, the angler will be casting into the wind, not being assisted by it. Wind direction changes depending on the weather and time of the year, so different pegs will be slightly different depending on the weather.

The [Water] section contains variables that adjust or set the water quality of the whole peg.

The PH variable specifies the PH of the water, with 7.0 being neutral, 1.0 being strong acid, and 15.0 strong alkaline. Chalk streams, for example would have a PH value of probably around 8, with them being alkaline. Peaty lochs, are acidic, and would have a PH value of around 6.0. Some species of fish prefer acidic water, where others prefer alkaline water. The PH of the water will affect how well fish behave in your venue. Water hardness (dH) is not used as a factor in determining fish behaviour. This is not to say it doesn't affect fish, but there is a close link between PH and dH in water, that is calcuable. Settings of 5.0 to 9.0 should be used, values outside of this range, will not help a lot of the fish in the peg.

The O2 variable indicates whether or not the peg is oxygen rich or poor. It's not the same as the PH setting, because O2 levels in water are calculated within Fishsim 2 based on weather and various other factors. The setting here can be used to "generally" raise or lower the oxygen content of a peg. A setting of 2.0 will effectively double the oxygen levels in the water throughout the peg. A setting of 0.5 will halve them, with a setting of 1.0 not changing them.

The Turbid variable indicates the water turbidity ( cloudiness ) and is represented as a percentage. A setting of 100% indicates extremely cloudy water, which will result in generally warmer water temperatures, but lower disolved oxygen levels. Light also does not penetrate as deeply through the water, which can result in objects affected by photo-synthesis, such as plant life, adding to the oxygen depletion. Clear water, a setting of 0 % will result in generally cooler water, with more dissolved oxygen, both as a result of the temperature, and plant life oxygenating the water. Water temperate in clear water can change quite quickly throughout the different levels though. Be careful if making the water too muddy, this can really reduce the O2 content in a peg.

The Saline variable indicates the salinity ( salt content ) of the water. Like turbidity, it is represented as a percentage, with 100 % being very salty, a setting of 0 containing no salt. Most freshwater coarse fishing pegs will have a setting of 0.

The Temp variable can be used to adjust the overall water temperature of a peg. It's implemented in a similar way to the O2 variable, with a value of 0.5 effectively halving the temperature, and a value of 2.0 doubling the normal temperature. A setting of 1.0 will leave the temperature as nature intended for the peg.

For sea venues a SeaType line can be added to the [water] section to indicate the type of sea venue. The default setting is 0 if a sea type line is not present. The values in the table below refer to different sea types.

Value Description
0 Not a sea venue
1 Sandy beach
2 Estuary
3 Pier
4 Rocky shore
5 Muddy beach
6 Shingle beach
7 Sandy with rock patches
8 Deep open water
9 Wreck

For example, if the line SeaType = 2 was included in the [water] section of the .peg file, this would indicate that the peg is an estuary peg.

You can alter the default light penetration depth in the water by adding a MaxLight line to the [water] section. For example, if a line is added which reads MaxLight = 360, this would indicate to Fishsim 2, that at best, bright light can only reach a depth of 360". Anything deeper than this would be dark.

For sea venues with tides, the effects of the tide motion can be seen on tackle, some pegs will be rougher than others, therefore a TideFact line can be added to adjust this effect. A value of 1.0 is the default, a value of 0.5 will halve the tide effect on tackle, a value of 2.0 will double it, making it a very rough peg to fish, requiring heavy tackle.

The variables in the [Ripple] section can be used to create a rippling water effect on a peg. Before embarking on ripples, there are a few factors that should be considered. At present, the Fishsim 2 "overlay masks" aren't implemented, which means that applying ripple effects to pegs where there are foreground objects, such as the bank, trees, etc.. can look strange. There are a few ways around this :

- Don't have ripples on the peg
- Manipulate the image to cover the foreground objects with water

If you have a peg image with no foreground objects, then a ripple effect should be implemented. This then leaves the choice with the angler as to whether or not to have it turned on.

The On variable can be set to either 0 or 1. If set to 0, no ripple effects will be visible on the peg, irrespective of the anglers settings in Fishsim 2. A setting of 1 means that ripple effects are present for the peg, and the angler will have the choice whether or not to have them on. If ripple effects are turned off, the settings below have no effect.

The Frames setting can be used to set the number of frames in the ripple animation sequence. The animation sequence of the ripples is not pre-determined, but calculated on the fly, so the setting here will not degrade performance in any way, even if set to a high value. A low setting will result in a clearer repeating pattern. A high frame value will result in a pattern that is not easily recognisable. This value should be altered and changed until the desired effect is found. This applies to most of the settings in the ripple section.

The YAdd variable tells Fishsim 2 where on the image to start animating it, in a Y direction ( vertical ). The image is based on a co-ordinate system with ( x=0, y=0 ) being the top left corner of the image. A setting of 210 indicates that the ripple effect will start animating 210 pixels from the top of the image and continue downwards to the bottom of the image. If the ripple effect, ripples the vegitation or objects on the far bank, this value should be increased. The exact start of the ripple is also governed by the YAddDiv variable, described below :

The XWave variable can be used to specify an X direction "judder" to the ripple effect. Valid values are 0, 1, and 2. A setting of 0 indicates no juddering ( normal ). A setting of 1 gives a slight juddering effect, with 2 being strong.

The Damping variable affects the ferosity of the ripple waves. A low value will result in a wilder looking wave, with a high value being a gentler wave. Low damping values can be very distracting, and create quite a nautious effect.

The DivModWave variable can be adjusted to fine tune the damping.

The Speed variable can be used to adjust the speed of the wave action, or more specifically the speed of each frame in the animation sequence. A low value of 0 or 1 is very fast, with a higher value slowing down the animation.

The YAddDiv variable is linked to the YAdd variable, and can be used to damp portions of the image further. A value of 0.7 will damp the top 70% of the image more. A value of 0.3 will damp the top 30% of the image more than the rest.

The Reverse variable can be used to set the direction of the wave motion. If set to 0 the ripples will appear to come toward the angler, a setting of 1, will make the ripples move away from the angler.

The ripple effect settings are difficult to put into words. The easiest way of finding out what each does is by trial and error, until the desired effect is found.

Quick recap

Each .peg file corresponds to one peg on a venue. They should be located in the venue folder, each with a different filename. There are quite a few variables to set with each peg file. It is advisable to make use of the Windows copy->paste feature, as most of the values will only need minor changes. If ripple effects are to be used, try to omit foreground objects from the scene using a paint package, and try different values for the variables until the desired effect is reached.

Stocking fish
There are now two ways to stock venues, previously with the beta versions, the only way was to use the stocks line in the .peg files. This way still works, however there should be a line added to the [files] section of the peg files which reads IncStk = 1. This tells fishsim to scan through the stocks folder for the peg for any stk files and include the fish in the peg. In future venues, this older method shouldn't be used, instead have the IncStk = 0 line.

With the release version another, far easier method can be used to stock pegs, in which a single file can contain all the species and behaviour for all the fish on the peg. This file can be set with the Fish line in the [Files] section of the .peg files. For example, if the line Files = venues/lot/stocks/peg1/peg1.all was included in the [files] section fishsim would use this file to work out what fish to place in the venue. These files, like most of the others are text files and a small example is shown below :

Qty Stock behaviour file Name Graphic file
600 species/stocks/carp02.stk [None] [None]
200 species/stocks/carp03.stk [None] [None]
100 species/stocks/carp07.stk [None] [None]
1 species/stocks/carp15.stk Carl [None]
1000 species/stocks/perch01.stk [None] [None]
200 species/stocks/perch02.stk [None] [None]
70 species/stocks/perch03.stk [None] [None]

The small example above, shows that the peg contains 2,171 fish ( carp and perch ). The first line, 600 species/stocks/carp02.stk [None] [None], shows a shoal of 600 small carp being added, the number at the end of the behaviour file can be used as a "very rough" guide to the age of the fish ( in this case 2 year old carp ). Note that the use of the word shoal does not indicate that these 600 fish will spend there days together in a large shoal, they do seperate in the water. If the name column is set to [None], then the shoal doesn't have a name. When setting a named fish, the qty should be 1, even though the possibility does exist to name every fish in a shoal. Also names should not contain spaces, if a space is required, use the £ sign instead of the space. The graphic file column at the end is used to specify a different graphic to display from the default one for the species. eg graphics/species/btrout1.pcx. could be used if the brown trout being placed in a peg are different in appearance to the default. You will need to create and distribute additional graphics though in the JR2 distribution files.

Note : You can't use commented lines ( starting with ; ) or equals ( = ) signs in the .all files.

When creating stk files to be used in this way, a qty value is not included in the stk file, as this is taken from the .all file. Note this is different to when stocks are created in the folders of the pegs ( below ). You are free to create stk files for the species/stocks folder, however please be careful that you do not overwrite anyone elses ! The best thing to do would be to create a sub folder to hold your base stocks. For example, species/stocks/jase, any that you do create you should distribute with the venue or put a seperate JR2 file out with a note that it is required. Or as seems to be what is happening, create a folder inside your venue folder, to hold the stock files for the venue, this is a far more desirable practice than to create a folder in the species folder. Only create a folder in the species folder if you are planning to share stock files between venues, and are prepared to take the hassle that comes with it when a user doesn't have the base stocks installed.

You can intermingle the two stocking systems, ie have some shoals defined in the .all files and some defined in seperate stk files, but the .all method is the more accepted and recommended way of stocking a peg.

Adding fish through the stocks line

Fishing Simulator version 2 now has stocked fish, in actual quantities, which is a totally differnent arrangement to version one. It is the creator of the venues responsibility to stock each peg on the venue with fish. The exact amount of fish to stock will depend on the size of the peg, and the general feel of how it fishes.

When creating the .peg files for each peg, there is a Stocks variable in the [Files] section. This variable holds the search path to the pegs fish stock files, which probably have an .stk extension. Fish are stocked in "shoals", this does not mean they will stay together as a shoal when in the water, just that they are stocked this way. It would be a time consuming process to stock each fish individually on a peg, which is the reason why shoals are used. You can, if you wish, have shoals of a single fish, but if you're planning 2,000 fish, this will take a while to stock and also to load the peg in FS2 as well.

To fully understand the .stk files requires a knowledge of fish behaviour which is defined in the .sp files in the SPECIES folder of Fishsim 2. In short, each species defined in the SPECIES folder of Fishsim 2 can be placed into a peg. In its simplest form the behaviour of the species will be left as the default, defined in the species definition. You can however re-define the behaviour of any shoal so that it is more suitable for the peg you are creating, this is strongly recommended.

The format of the .stk files is similar but slightly different to the other types of text files used in Fishsim 2. There are no sections, variables etc.. and the '=' ( equals ) sign is not used. An example of a very minimal and simple stock file is shown below :

REF Roach
MINSIZE
50
MAXSIZE
120
QTY
150

If the .stk file is created and stored in the stocks folder of a peg, it will add 150 small roach between 50 and 120 drams to the peg. The size is always specified in drams, because this is the lowest divisible unit of weight in Fishsim 2. There are 16 drams to an Ounze, and 256 drams to a pound. These 150 roach have all got the default species behaviour for the roach, because nothing else is defined, specifically for the peg.

The REF value must correspond exactly to the REF value in the species folder. Any fish stocks with a REF value that isn't found in the SPECIES folder will not be stocked into the pegs.

The MINSIZE value holds the minimum size range of the fish in drams.

The MAXSIZE value holds the maximum size range of the fish in drams.

The QTY value holds the shoal size in fish numbers

The filename of the stock file is not important, so long as it has a .stk extension. The example above, could be saved as roach1.stk in the stocks folder of a peg. You can add further roach shoals of different sizes if you like to the same peg. For example :

REF Roach
MINSIZE
120
MAXSIZE
250
QTY
60

This will add a further 60 roach to a peg, this time they are slightly larger, between 120 and 250 drams.

The stocking of fish, is left entirely down to the creator of the venue, as is the behaviour, and size ranges. When creating a peg, it is hoped that this will be done responisbly in the interests of Fishsim 2 as a fishing simulator. It is possible to stock thousands of 20 lb grayling in a small muddy pond, and catch them regularly on a dead herring. Clear unrealistic but possible, if the venue creator wishes. This sort of thing won't be good for Fishsim 2. To show how this is possible, the following shoal file contains a 1,000 barbel with the behaviour changed from the default for the species.

REF BARBEL
MINSIZE
100
MAXSIZE
256
QTY
1000

TEMP
16.98 -4.0 32.0 2
O2
8.0 2.5 22.0 3
PH
7.0 6.0 9.0 1
FDEPTH
70 -100 200 2
LIGHT
75 -70 150 2
SALINE
0 -10 2 2
FLOW
0 -10 50 4
COVER
30 -90 120 2

More information on the added behaviour factors above can be found on this page. It is strongly recommended that you understand how shoal behaviour works when creating a venue. It's a 30 min process to create a venue with basic shoal behaviour, but to create one that is interesting and correct could take weeks, or even longer.

It may seem a bit strange at first, by allowing the behaviour of the same fish species to change from shoal to shoal or peg to peg, but fish behaviour does change with different factors. For example, large roach feed mainly off the bottom, small roach are much broader in there feeding depth. One venue may seem carp acting in a different way to another venue. These behaviour changes can be simulated with Fishsim 2.

There's no limit to the number of shoals that can be stocked into a peg.

The peg editor
All the file editing is done now, well nearly anyway... The rest is mainly automated inside Fishsim 2. As mentioned at the start, it is planned that the whole process described above will have different 
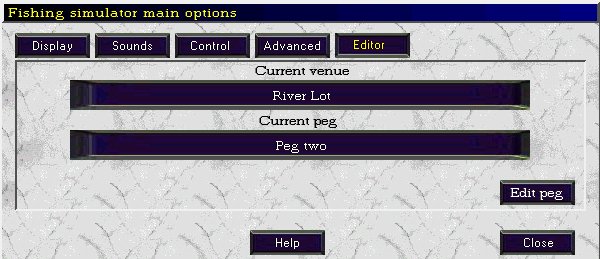
programs created to make things simpler.

So far, there's a venue created with a weather pattern and pegs on the venue with effects and fish stocks. The only thing left to do now is define each peg in more detail, i.e depths, objects and flow. This is all done from within fishsim in the Peg Editor section.

At present this can be accessed from the "Options menu", under the editor tab.

The selected venue and peg are shown in the two dark blue boxes. These can be changed by clicking on the venue name and selecting a different venue from the drop down box. The peg works in a similar way. Once the peg and venue you want to edit is selected, click the "Edit peg" button to start the editing process.

The peg editor screen will now be displayed. The main thing to notice is the three buttons at the top :

These three buttons can be used to toggle between three modes

- Depth : When selected it will allow you to specify the depth of different areas of the peg
- Objects : When selected it will allow you place various objects into the peg ( weed, rocks etc.. )
- Flow : With this selected, you can define the flow of the water on the peg.

The mode currently selected, will be displayed in green with the unselected options in white. When you first enter the peg editor the depth mode will be selected.

At the bottom of the screen will be more option buttons, looking something like below :

There may be more depending on which mode is selected.

The Close button, does as it says, and exits out of the peg editor screen.

The Grid button can be used to toggle a grid over the peg image on and off. The size of the grid squares will be dependent on the XGrad and YGrad settings in the [Distance] setting of the .peg file.

The Clear button can be used to display a semi-transparent view of the colours on the peg edit screen. It is especially usefull when setting the depth of the peg, because you can see the image underneath the coloured grid square.

The Fill X button can be used to fill in areas of the peg in an X ( horizontal ) direction. Using this feature can save a lot of time when creating pegs with the peg editor. The cursor on the screen will change when this option is selected, as a reminder it's on.

The four black boxes show the mouse screen coordinates in pixels ( top boxes ), and the peg grid coordinates ( bottom boxes ). They change as the mouse moves over different areas of the peg image.

Specifying peg depth

To specify peg depth make sure the "Depth" mode is selected.

Down the right hand side of the display will be 22 buttons, each indicating a depth range.

The first button will probably be coloured green and read "Land". The contents of the rest of the buttons depend on the DPRatio setting for the peg, but will start with a shallow depth range, going down to a deep depth range. The blue coloured square boxes on each button, show a colour code for the depth range, going from light blue to dark blue ( nearly black ). You can choose any depth range by clicking on the relevant button, the text should turn green.

At the bottom of the button set, will be two further buttons, "Imperial and Metric", one of these will be selected, indicating what unit of measurement is displayed on the buttons. Below these is a black box, this will display the depth of the area the mouse cursor is currently over.

With a depth selected from the button bar, you can click anywhere on the peg image to set the depth of the water at that point. If the Fill X option is selected, The depth will be filled in an X direction.

When setting the peg depth, be careful not to set the depth of any land areas on the peg image. The angler will be able to cast in these areas, if you do. If you accidentally set an area of land to a depth, select the "Land" button at the top, top clear it.

Specifying depth is virtually exactly the same as in version one, with the following improvements made :

- Transparency using the clear button can aid setting depth
- When setting land, a white box is no longer displayed, but the background of the image
- Different depth ranges can be specified, by changing the DPRatio peg variable
- Depth can be displayed in metric units

Do not just select one of the depth buttons on the right hand side and fill the entire peg like this, try and create as many different depth areas and features as possible. This will give the angler more "choices" when fishing, and features to aim at. If you create a peg, where the depth is the same throughout, and there is no objects, then the angler may as well fish at his/her feet, as it will be the same as any other area on the peg, apart from it is easier to reel the fish in. It's easy to initially kid the fishsim angler into thinking they have actually found features on a peg, but they will soon realise it is all the same throughout.

Specifying peg objects

The objects placed into a peg have had a massive overhaul in Fishsim 2. Version one has pretty much "set objects", in which all pegs made contain. Fishsim two has no restrictions, which will allow for a diverse set of different venues and pegs to be created.

To place peg objects into the peg select the Objects button to enter object mode. As you do the display will change, with a row of 32 buttons being placed on the right hand side of the screen. With a new peg these buttons won't contain any text.

You can place upto 32 objects into a any one peg. These objects are not set in stone, like version one, but can be selected from the add objects list. Three new buttons are also positioned at the bottom right of the screen with object mode selected.

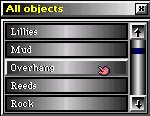
The buttons titled Add objects can be pressed to access a list of all objects known to Fishsim II.

When the Add objects button is pressed, a listbox will be displayed ( shown above ). This list box contains every peg object contained in the OBJECTS folder of Fishsim 2. You may need to scroll down the list view them all. Whenthe cursor passes over an object in the list, it changes to a hand, clicking on the object will place it in the first free position on the right hand set of buttons. This object will now have been defined as one of the 32 allowable objects for the peg. You can add an object more than once. For example, if you want 5 gravel objects this is acceptable and useful for very gravelly pegs. It is unlikely that you will need 32 objects per peg, but there just incase.

Once you have decided on the objects needed to define a peg, click the small X at the top right of the All objects list box to close it.

If you accidentally add an object that is not required, you can remove the object from your list by selecting it, and clicking the Delete object button at the bottom of the screen. It is better to remove an unused object from the list, to increase performance when the angler is fishing the peg.

With some objects selected you can start to select them and draw them onto the peg, in the same way as the depth ( described above ). It doesn't matter if you draw over land portions of the image with the peg objects, unlike depth.

If you accidentally draw an object onto an area of the peg, that you didn't intend. You can use the Erase button to erase the object from the water.

As a different object is selected from the possible list of 32, the display will clear and re-draw with the new selected object. This doesn't mean the previously selected object has been removed, it's just not being displayed. All objects will display on the editor screen in a different colour. This is not just visual, but the colour actually affects the fish. Fish that use sight to find food, will see a bait better if the bait and object colours are contrasting. For example, yellow corn, fished on yellow sand will not be as visible as if it is fished on a dark brown muddy area.

More importantly, objects affect there surrounding water conditions in different ways ( swimfeeders and loosefeed don't !! ). Generally plant objects will oxygenate the water in the daylight, and de-oxygenate the water at night times. More information on how objects affect the surrounding area can be found below.

The same applies to adding objects as it does to depth, try adding more objects rather than less, to give the angler more unique areas to fish. Also you can add the same object to the list more than once, and draw them on top of one another, increasing the objects effect on the area. Due to a bug in earlier versions, it is also advisable to add an extra "unused" object to the bottom of the list, otherwise the final object may not be taken into consideration when fishing.

Creating different objects

You can if you wish create different objects than those contained in the OBJECTS folder of Fishsim 2. Every file with a .fso file extension stored in the OBJECTS folder represents an object type ( mud, weed, etc... ). You can create more by creating a new text file. The format of the file is standard, with sections, variables, and values. A sample is shown below :

[Details]
Name = Mud
Ref = MUD

[Quality]
O2 = 0.9
SALINE = 0
PHOTO = 0
PH = 1.0
TEMP = 1.03
LIGHT = 0
COVER = 1

[Camouflage]
Colour = R080 G040 B000

The [Details] section holds general details about the object.

The Name variable, contains the name of the object, the only place this is used is in the all objects listbox.

The Ref variable, must contain a unqiue reference name for the object.

The [Quality] section contains variables which specify how the object affects the surrounding water quality.

The O2 value should be set to a factor that is applied to the oxygen content of the water ( Note : only if the object isn't a triggered object - see below ). A value of 1.0 indicates the object has no effect on the oxygen content in the water surrounding it. A value higher than 1.0, for example, 1.1, means that the oxygen content of the surrounding water will be increased by 10% ( 1.1 - 1.0 = 0.1 * 100 = 10% ). A value of less than 1.0 reduces the oxygen content, for example 0.9 reduces the O2 content by 10% ( 0.9 - 1.0 ) = -0.1 * 100 = -10% ). If the Photo variable is set to one, this only applies to light conditions, in dark conditions the opposite effect occurs. The values stated are only rough estimates, with objects that have the Photo value set.

The Saline value is not a factor light the O2 value, but a direct value that affects the water salinity. A value of 0 means that the salinity of the surrounding water is not affect, 10 increase the salinity by 10%, -10 decreases the salinity by 10%

The Photo variable can be used to specify if the object is affected by photosynthesis. A setting of 0 indicates that its not, a value of 1 indicates that it is. Normall plant life will be set with the Photo variable to 1, as they emit oxygen in light conditions, and consume oxygen in dark conditions. A setting of 1 here, reverses the O2 setting. It is possible to have an object that works in reverse with the photo set. Note, if the object being created is a triggered object, the photo variable has to be set to 0.

The PH is a factor that affects the PH of the water surrounding the object. 1.0 is no change, < 1.0 Water becomes more acidic, >1.0 water becomes more alkaline.

The Temp variable can be used to create objects that directly affect the surrounding water temperature. It's a factor like the O2 and PH with a setting of 1.0 not affecting the temperature, < 1.0 = surrounding water cools, >1.0 surrounding water heats ( Note : only if the object isn't a triggered object - see below ). This can be used to create artificial water heaters etc.. even giesers.

The Light variable works in the same way as the Saline variable. It's not a factor but a direct value indicating how the object affects the light percentage in the surrounding water. A negative value reduces the light ( usefull for large trees and bushes which cast a shadow ), a positive value increases the light ( underwater lighting objects can be created if so wished ).

The Cover variable represents how much Cover the object provides to fish. It's a percentage ( 0->100 ). Some fish species prefer covered environments. Objects such as reeds, rocks, provide cover. Mud and sand don't.

The [Camouflage] section contains just a single variable at present, the Colour variable. This value represents the colour of the object, specified in three different components ( red, green and blue ). They are always three digit values, and always in stored in the order RGB. A space must be included in between each colour component. The range of values can be set from 0 - 255. This makes it possible to choose from over 16 million different colours for objects.

A colour value of R255 G255 B000 represents yellow ( lots of red and green, but no blue ). R050 G050 B050 is a dark grey colour, with all the values the same ( shade of grey ) and low ( dark ). White is represented by R255 G255 B255 ( all colours maximum ), with black being R000 G000 B000

You can check to see if you have roughly the correct colour on the peg editor screen in Fishsim 2, where it will be displayed when you add the object.

Colour can be quite important to fish that have good sight. The contrast between things like bait and object colour will determine if the fish sees the bait. On the other hand the contrast between line colour and object colour will determine if a fish sees the line ( not good ). This arrangement means that different baits and lines create will behave slightly differently on different pegs, or even different areas of a peg.

You can also have Triggered objects, in version 2.08 or higher. These are objects that can directly affect the O2, Temperature, and/or Light values of the surrounding water where the object is placed, depending on certain conditions being met. Triggered objects will not work in versions lower than 2.08 though, and will likely have an adverse effect on the temperature and O2 on the peg, so any venues containing triggered objects, must be explicitly stated that they should not be used on versions less than 2.08.

Lets say you wanted to incorporate a water heater device that increased the temperature of the surrounding water by 'x' degrees C at a certain time range in the day, eg 6 am to 2 pm, this is possible with trigger objects, as well as quite a few other types of device object you may want to create and use.

To make a trigger object a section similar to the following should be added :

[Trigger]
Type = 1
Min = 06:00
Max = 14:00
Grad = 0

If this section is not included in the FSO file, or the Type is set to 0, then the object will be treated as a non-event triggered object. There are three types of trigger ( or sensor ) if you like, that can be used, which is indicated in the type line.

1 = Time based trigger : The min and max values specify the time ( hh:mm ) range that the object will be active for. In the case above it is 6am until 2pm. Time formats must be specified in this way using two digits for the hour, a colon, and two digits for the minute, even if the hour and minute values are less than 10. You can cross the midnight boundary without any problems, for example, you can have the object trigger at 23:00 and end at 02:00 by setting the min and max accordingly. The MIN value is always the start time, whether this be a higher numerical value than the max or not. The Grad line isn't used with time based triggers.

2 = Air temperature based trigger : Note ( air not water, it is impossible to have triggers initiate on water temperature due to it not fitting in with the initial program design ). The min and max values specify two temperatures in degrees C, when the air temperature is within these two temperatures, the object will be triggered. The Grad value is used with temperature triggers, and can be set to either 0 or 1. See below :

3 = Light based trigger : The min and max values represent two external light ranges and are specified as percentages, 0 = dark, 100 = bright. If the external light is between these ranges, then the object will be triggered. The Grad value can also be to 0 or 1 as well ( see below ).

All triggered objects affect either the surrounding water temperature, surrounding o2 level, or the surrounding light ( all in water ). To what degree the object changes these depends on the relevant settings in the Quality section. These are set differently to normal objects for the temperature and O2. With normal objects these values are "factors", eg a Temp value of 1.2 will multiply the surrounding water temperature by 1.2, so if it's current 10, it will become 12. This IS NOT the case with triggered objects, the Temp and O2 values in the FSO file should be set as absolute values. So for example, given the ( shortened, eg not complete ) FSO settings below :

[Quality]
O2 = 7.0
TEMP = 3.0
LIGHT = 30

[Trigger]
Type = 1
Min = 06:00
Max = 14:00
Grad = 0

This will create a device that will be activated between 6am and 2pm, and while active will increase the surrounding O2 by 7.0, increase the surrounding temperature by 3 degrees C and increase the light by 30%. You probably wouldn't have a device with as many multifunctions as this though, probably just having one to increase the Temp, or O2, or Light, if this is the case leave the other two settings at 0, which means the object won't change them. Note, always have the PHOTO set to 0 in the FSO file also when creating triggered objects.

The Grad line can be used when creating objects that are triggered by temperature and light. With the Grad set at 0, this acts like an on/off switch, eg when the trigger condition is met it is on, when not met off. The grad line, if set to one, can be used to graduate the effects.of the O2, TEMP, and LIGHT values, depending on how far inside the range it is, eg

Another quick example using grad = 1 :

If LIGHT is set to 100 in the [quality] section, and the following trigger section is used :

[Trigger]
Type = 2
Min = 10:00
Max = 20:00
Grad = 1

( EG trigger on a temperature between 10 and 20 degrees ).

Without the Grad = 1 line, this would add 100% to the light when the temperature reached the range because the LIGHT = 100 line is in the quality section. However the Light value added will depend on what the temperature is, if it is say 15 degrees ( Eg 15 is bang in the middle of min [10.00] and max [20.00] ), this will add 50 to the light, if it is 12.5 degrees this will add 25 etc.. So it graduates between 0 and the settings in the quality section depending on how far into the min - max range it is.

Once you have defined a .fso object file, it can be added to any pegs from there on in. There is no limit to the number of different objects that can be created. You must be mindful of the fact that the remote user, importing your venue, may not have the same FSO files as you, and if the objects used in your venue, are not part of what is included on the default installation, then you should either warn the user that the venue requires them, or include them in your distribution JR2 file for the venue.

Specifying the flow of the water in a peg

Flow in Fishsim 2 has received a big overhaul over the system in version one. The main improvement here is in how flow direction is specified. In version one, there were 8 polar coordinates, which resulted in a jerky effect when direction was changed. Version two still uses polar coordinates, but with more accuracy. Flow direction can be specified in 5 degree angles.

Flow speed has also been changes, there are now 15 different flow speeds, 1 being slow, 15 being very fast. On top of this there is a surface water speed and an undercurrent speed.

Displaying the flow speed and direction on a peg is difficult within a single grid square, and quite hard to decipher. Two new buttons are added at the bottom of the screen ( Speed and Direction ):

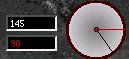
They are toggle buttons, the speed button, when green means the flow speed boxes will be displayed. The direction button when green means the flow direction white line will be displayed. Fill X effects are affected by which of these is toggled on or off. Flow speed is represented in each grid box by the box split into two halves. The top half colour represents the speed of flow at the surface. The bottom half colour shows the undercurrent speed.

On the right hand side of the editor the flow speed of both the surface and the under current can be selected and drawn on to the peg.

The direction of flow is shown at the top of the screen, by both a line and a numeric value.

The black line on the dial indicates the current selected flow direction angle. It can be changed by pressing the CTRL and ALT keys to the left of the spacebar on the keyboard. Clicking on the peg editor will set the flow direction at that point to this selected angle. The angle is also show numerically in the top box in white. The red line only appears when the cursor moves over an area of the peg defined. It shows the angle of the flow that is current set at that point. It's also displayed numberically in red.

After the peg has been edited, it can be returned to, to make changes. There is no save or load feature, this is all done automatically when you enter or leave the peg editor screen.

Apologies for the brief and fast description of the peg editor. It's better understood by using it, than reading about it.

Summary
That's about it to creating pegs, with fish stocks and features. The whole system is slightly more complex than version one, but quicker. It also allows for a wider variation in the pegs created. It probably takes longer to read this page than it does create a venue ! Once one is created, a lot of copying, pasting and modifying can be done to speed the process up, but still try to create interesting venues, with lots of different depth and object features, with fish shoal behaviour that matches them well. This will give your venue longevity, and certainly make it more appealing to the end user. Always aim for longevity in a venue, by having challenges that are difficult to achieve, for a lot of people, there is nothing worse than downloading a venue, fishing it for 30 mins, and catching the biggest fish in there. Make at least some shoals difficult to catch, requiring anglers to think about catching them and to try different things ( not just bait ), that way, they'll stick at it, and continue fishing your venues for longer, instead of putting them in the "only pull out for a match" drawer.

(c) J.C.Spooner 2001