| The float .tkl files
are stored in the same way as other Fishsim II tackle
files, with sections, variables, and values that define
the behaviour of each float. There are two
sections in the float .tkl files ; [HEADER]
and [FLOAT].
The HEADER
section has four variables, Name, Ref, Desc, and
Type.
The Name
variable, specifies the name of the float that appears on
the tackle screen. It can be as long as you like, and
contain spaces, however, it is better to keep float names
short, as long names will overwrite parts of the display
on the tackle screen.
The Ref
variable, must be set to a unique reference name for the
float and can contain upto 12 characters, with no spaces.
The Desc
variable contains the relative path and file name of an .fsb
help file associated with the float. One doesn't have to
be included, and if not, set this variable to [None].
The Type
variable must be set to 7, if not the
float will not be recognised in the tackle screen. The
reason it is included, is to prevent the .tkl
file being recognised as another piece of tackle if it is
incorrectly placed in the wrong folder.
The FLOAT
section contains variables and values which define the
specific usage and behaviour of the float.
The Graphic
variable value should contain the relative path and
filename of the PCX image file of the small float that
appears on the line in the tackle screen. This should be
a 256 colour PCX with colour palette index 0 being used
as the transparent background colour that is not
displayed. The image width in pixels should be divisible
by 2, for example, 2, 4, 6 pixels wide etc.. An image
with a pixel width which isn't divisible by two will not
display correctly on the tackle screen.
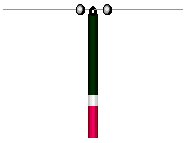
If an
eyed float is being created, the float image should be
created to be displayed vertically, with the tip of the
float at the bottom.
Rubber
connected floats, should be created with an horizontal
image of the float, with the tip of the float towards the
right side of the image.
Controller
float images, like rubber connected float images, should
be horizontal, but with the tip of the float on the left
hand side.
Slider
float images, again should be created to display
horizontally, with the tip of the float on the right of
the image.
There is
no exact size for float graphic images, but an apropriate
size should be used for the display on the tackle screen,
in accordance with the length of the float.
The Biggraphic
variable should contain a relative path and filename of a
JPG or PCX image file that will be displayed in the large
box on the tackle screen, when the float is selected by
the angler. To fit perfectly in the box, this image
should be 200 pixels wide by 100 pixels high. Smaller
images can be used, but larger images may disrupt the
display. JPG images are preferred, because of thier small
file size and image quality.
The PX
and PY value are used to
position the Graphic image of the float
exactly on the line. If the graphic image does not appear
in the right place these values will need to be changed,
and represent pixel additions or subtractions in both the
X ( horizontal ) and Y ( vertical ) directions. A
negative value for PX will move the
float left on the display, a positive value will move the
float right. A negative PY value moves
the float image up, with a positive PY value
moving the float down, by however many pixels are
specified.
The Topeye
and Boteye indicate how many
"eyes" for the line to pass through the float
has, as well as there position on the float. Fishsim II
doesn't know of the float types listed in the
introduction, and uses these values to determine the
exact usage of the float. The table below can be used to
find the settings of the type of float you are creating.
| Type
of float |
Topeye |
Boteye |
| Eyed |
0 |
1 |
| Rubber
Connected |
0 |
0 |
| Controller |
1 |
0 |
| Slider |
1 |
1 |
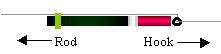
The Right and Left
variables specify the closest distance away ( on both
left and right sides ) that shot or other objects can be
placed on the line. The values are specified in inches,
and all tackle on the tackle screen is placed within,
1/4" ( 0.25" ) deviations.
The SX
and SY values are size values in pixels
of the float. Ideally, these will be the same as the
image dimensions specified in the Graphic
variable. They are used to indicate the "bounded
box" area around the float on the line, so when the
mouse cursor passes into this box, the float can be moved
or selected by the angler. By increasing these values, it
will make it slightly easier for the angler to adjust the
tackle on the line, but if increase too much, it may
interfere with other tackle on the line, by selecting the
float when the cursor is positioned over a close by shot.
The Recweight
can be set to anything you like, it's included
to specify the recommended weight for the float in a text
string. This value can contain spaces, and is displayed
on the tackle screen float selector box. It should be
kept small, because of the width on the tackle screen.
This is only used for display purposes to aid the user
setting up the float.
The
variables so far have all dealt with the way the float is
displayed on the tackle screen, not while fishing on a
peg. The remaining variables deal with the fishing
behaviour of the float.
The Width
variable value indicates how wide the float should appear
in pixels. It's important to note, that this is specified
in pixels not inches, because the width of the float is
not affected by distance, in order to retain some
visibility when fishing a long way. Thin floats should be
set to 1, while fat floats should be set to a higher
value ( 2, 3, 4, or 5 ).
The Length
variable is the length of the float in inches. This is
not the ideal visible length, but the total length of the
float. This value is affected by distance, and the float
will appear to be smaller when fishing long distances.
The Tiplen
value, specifies the length of the float tip in inches.
It should be less than the length variable above, for
obvious reasons.
The Cocklen
and Cockweight variables are currently
not used.
The Inchpergr
variable stands for "Inches per gram",
and is used to specify how many inches the float will
sink with 1 gram of weight or force is
applied. A high value results in a only a few small shot
being added, to sink the float, with a low value meaning,
a lot of heavy shot will need to be added to sink the
float. This is not a measure of float bouyancy.
The Weight
variable can be used to set a weight to a float
without it affecting the float height in the water.
Self-weighted ( cocking ) floats have weight in-built in
to the float. Slider and controller floats should have a
weight value in order to enable them to be casted
further.
The TC,
MC, and BC values are used to
set the colour of the various parts of the float when
fishing.
BC
= Bottom colour ( main body of the float )
MC = Middle colour ( area between
main body and tip of the float )
TC = Tip colour ( Top tip colour of
the float )
These
values specify colour three colour mix portions ( Red,
Green and Blue ). Each colour can be mixed by adding
different quantities of these three primary colours ( 0
-> 255 ). Zero is no colour, 255 lots of colour. For
example a deep red could be created with the following :
R080
G000 B000 : 80 red portions, 0 green and no blue to
make the colour.
The
format of the colour strings has to be exact with each
containing Rxxx Gxxx Bxxx , where x is a three digit
number, and there is one space between the colour
components. Black and white can be specified by using the
colour strings below.
Black
R000 G000 B000
White R255 G255 B255
|