"The most realistic fishing simulation on the PC"
"The most realistic fishing simulation
on the PC"
Creating JR2 files with the Add-on manager
This is a large page, you can choose File->save as.. or Print from the menu to read it offline.
J.C.Spooner 2001
"JAR stands for Jase's ARchive, JR2 stands for whoops I ran out of letters !"
| Introduction |
| JR2 files in Fishsim 2 are virtually the
same as JAR files in Fishsim 1, and work on exactly the
same principle. The main reason for the change of the
file extension from JAR to JR2, is to prevent the older
fishsim JAR add-on's being imported into Fishsim 2,
unfortunately they are not compatible. JAR and JR2 files are very similar to ZIP files, but without any compression. In short they store a collection of files in a single file, and in doing so, remember the correct folders the files should be placed into, when imported on a remote computer. This is one of the reasons the add-on manager has to be installed into the fishsim folder. The add-on system in Fishsim 2 is far more powerful than in fishsim 1, as it enables any file in the fishsim folder to be added or changed. For security reasons, only files in the fishsim folder on the hard drive can be changed, any other's on the computer can't. The main reason for this is to prevent malicious use of JR2 files, if this protection wasn't in place, it would allow someone to create a JR2 file that could harm the operating system files ( ie. delete command.com ). Importing a JR2 file can not affect any files other than in the fishsim folder, however, this is still not totally safe, it is perfectly possible for someone to create a JR2 file that deletes the fishsim2.exe file ( not good ). For this reason, an extra precaution has been added, through a password system. At the moment, you need a password to create JR2 files, please email, if you require the password. JR2 files also contain coded information on who originally created the file as well, which can be easily found out, if malicious JR2's are deliberately created. This page describes how to create a JR2 file using the File manager menu option, in the add-on manager. On top of this there is brief help, in the help section of the add-on manger, under Advanced. |
"JR2 files are not the same as JAR files"
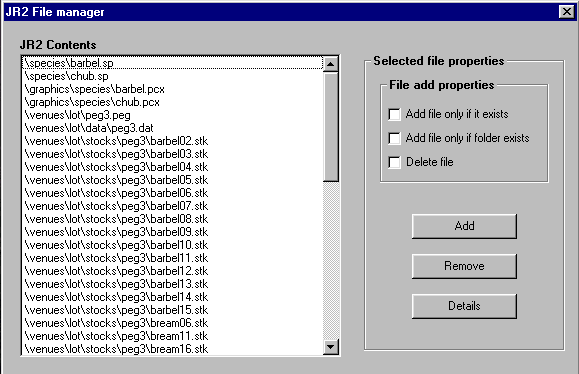
| The file manager |
| Select the Advanced ->
File Manager option in the add-on manager. You
will be asked to enter a password, which can be obtained
by emailing me. You will only ever need to enter this
password once, after that the add-on manager won't ask
you for it again. A screen similar to the one below will
be displayed, but probably with no files listed.
Keep in mind that JR2 files contain just a load of files, grouped together as one file. The large white box on the left, JR2 file contents, displays the files that are currently contained within the JR2 file you are creating. The full path from the fishsim folder is shown, to show where the files will be placed on the remote computer. The File add properties, should all be left un-checked ( with no crosses or ticks in them ), these are only used if you are releasing a modification patch to a venue or piece of tackle. The Add and Remove buttons are used to add or remove a file from the JR2. The Details button is currently not implemented. The add-on manager was produced quickly, in a couple of days, mainly because people were having problems importing venues into fishsim 2, from a winzip file. It will however be finished, and things will be a lot simpler and more automated than they currently are. |
"Eventually exporting add-on's will be as easy as with fishsim 1"
| Creating a JR2 with the file manager |
| Initially, the contents of the JR2 file
will be blank. To add files to the JR2, use the Add
button. You will then see a standard windows Open dialog
box appear, like the one shown below :
Through this dialog, you can select a file to add to the JR2, by clicking it, in the left list to highlight it, then pressing the Ok button. The dialog will the disappear and you will then see the file manager dialog again, this time with the file you selected listed in the JR2 contents box. This will come as a relief; You do not have to select one file at a time, you can add multiple files in one go (phew). To do this, click the add button as normal. To select multiple files, hold the Ctrl or Shift key down at the same time as clicking the filenames, to highlight more than one, before clicking Ok to add all the files in one go. The Ctrl and Shift keys work in exactly the same way as they do in most Windows applications, with the Shift key highlighting "ranges" of files and the Ctrl key highlighting files one at a time. You cannot add files that are outside of the fishsim folder, the add-on manager won't let you. Any files in the fishsim folder, or any folder coming off that can be added, nothing else. In the unlikely event you make a mistake and add a file, you didn't want to, you can remove the file from the JR2 list. To do this highlight the file in the JR2 contents list, and click the remove button. Multiple files can be removed, with the use of the Ctrl and Shift keys. They work in the same way as described above. When you remove a file, in it's place will appear [None] in the JR2 contents box to show a file has been removed. The next time you add a file, it will look for entries where files have previously been deleted and fill them with the new file, replacing the [None]. If one isn't file the new file is added to the end. Don't worry at the end of it all if you have gaps with [None] in them, the add-on manager will ignore them when creating the archive. Also, you don't need to worry about where files will be placed on the remote computer when the JR2 file is imported, this will all be handled by fishsim 2. As long as the venue, fish species, or tackle works on your copy of fishsim 2, it will on the remote computer. |
"The file manager gives you the power to do anything !"
| Creating a venue JR2 |
| At the moment, all we've got is the file
manager, although eventually there will be a similar
system to fishsim 1, where you can just click
"Export venue", and the add-on manager will do
the rest. In short, it's all got to be done by hand, for
now. When you've created a venue, you will need to add the following files to your JR2 archive :
You do not need to add any files with a .rgh, .rgv, .rlh, or .rlv extension, these files contain record catch information for the venue. Including them in the JR2 file will also include them on the remote computer. Niether do you need to include any weather files for the associated venue. Just the files in the above list should in most cases be fine. The only real time you may need to add other files, is if any different peg objects have been created and used in the venue. These are contained in the OBJECTS folder of fishsim 2. If you have used the standard objects ( mud, gravel, weed etc.. ) then you don't need to worry about this. If you've created a new species of fish for the venue, you may want to include the files associated with the species in the JR2 to, eg. .sp file, and graphic file. You can export venues with .stk files of fish species that the remote user may not have installed, in this case, they will be ignored by fishsim 2. |
"Information on who created the JR2 is encrypted and stored in the archive"
| Saving a JR2 file |
| Once you have all the files for the add-on
you need, close the add-on manager and choose the File
-> Save option, you will then be prompted for
a filename. Enter one, with a JR2 extension, and fishsim
will then go on and create the JR2 file ready to be
zipped up and advertised. You can re-load a created JR2 file and change it, by either adding more files or removing some. To do this, click the IMPORT button as normal, and select the JR2 file to import. A message box will appear asking "Do you want to import this add-on into fishing simulator", click the NO button and nothing will be imported. If you then go to the file manager, you will be able to view the contents of the JR2, as well as add and remove files. If you exit the add-on manager without saving, after you have edited a JR2 file, you will be reminded, and asked if you want to save it. To start a fresh JR2 archive, click the File -> New menu option. |
"You can now include a brief description of the add-on inside the JR2 file itself"
| A few specials |
| JR2 files can contain small messages,
which tell the person importing the JR2, what it is they
are imported, and give them an opportunity to not import
it. After creating a JR2 archive ( before saving it ), select the Advanced -> Archive text option. A Windows input box will appear, where you can type a brief description of what the JR2 file contains. |
Please excuse the grammar, spelling errors
J.C.Spooner 2001