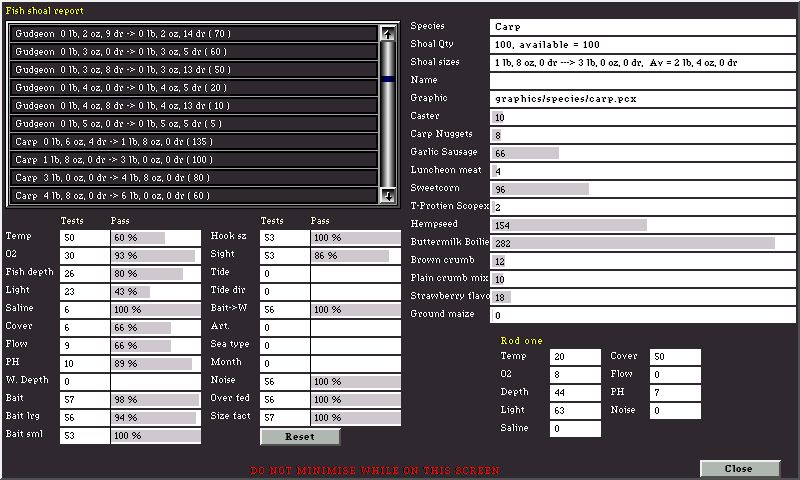
Understanding F11
J.C.Spooner 2002

With the F11 key you can access a few extra things that will hopefully make creating venues, pegs, fish stocks, and baits easier. The most useful of these is the F11 function.

When fishing on a peg that is being created F11 can be pressed to see how each individual fish is behaving, this is probably best done with fast fish on, as it will collect data a lot faster, although, it can be used with fast fish off as well.

When F11 is pressed a screen similar to the following will appear

While, at first it may look daunting, it isn't that bad, but some parts may need explaining.

Firstly, the large list box in the top left contains every single shoal of fish in the peg. There is one shoal for each entry in fhe peg.all peg for the peg. Don't make the mistake of thinking of a shoal as a "shoal of fish" though, the shoals in FS2 do split up, and don't necessarily stay together in the water, however they are set and shown as "one" for ease.

Each shoal in the list has the species name, the minimum size of fish in the shoal, the maximum size of fish in the shoal, as well as the starting number of fish in that shoal, eg :

Gudgeon 0 lb, 2 oz, 9 dr -> 0 lb, 2 oz, 14 dr ( 70 )

This represents a shoal of 70 gudgeon, with the sizes ranging from 0 lb 2 oz 9 dr to 0 lb 2 oz 14 dr.

You can analyse any shoal in the list, by locating it in the list and clicking on it with the left mouse button. You can also use the scroll bar to scroll between the shoals, although in the early released version of this, the cursor is a bit flashy over the scroll bar, sorry, it will be fixed in the next update.

After you click on a shoal of fish, the white text area boxes on the screen will probably be filled with information, specific to that shoal. There are two main areas with this information, to the right of the screen, there is general shoal and bait preference information, and below the shoal list box, there is information on what the shoal has been upto.


General shoal and bait information

There are 17 boxes of information in total here, each is explained in detail below :

Species - This just contains, the name of the shoal species, eg carp, roach, perch tench etc.

Shoal qty. - This shows how many fish are in the shoal, at the start of the session, and also how many are available to catch. It has been asked before, if fish can be caught twice, and the answer given was no, this proves that. Once a fish is caught, it is put into the keepnet and cannot be caught again, hence not available. You will be able to see this ( not in fast fish mode though ), by catching a fish on a peg, and then examining the number of fish available in the shoal, it should have dropped by 1. Putting a fish in the net isn't the only way the number of available fish can drop though, for example, if you snap or lose one, it may leave the fish in a state where it will just hide and recover for a while, which is effectively not available, and will be shown in this value.

Shoal sizes - This shows the size range of fish in the shoal ( smallest and largest ), as well as the average size of fish in the shoal.

Name - If the shoal has a name, the name of that shoal is shown here. Normally only shoals with one fish in them have a name, so this will indicate the name given to that fish.

Graphic - This is the graphic file that is displayed when a fish from the shoal is caught. Different graphic files can be specified when a peg is stocked for each shoal, if one isn't specified the default graphic is used.

( Eight bait preferences ) - The next eight entries show the baits you currently have in the eight boxes, along with a value to indicate how much a fish likes each. The name of the bait is shown as the title to the box, and the appeal of the bait is shown both as a value and graphically as a sliding grey bar. The values effectively have no range, but 300 + is considered an excellent bait for the shoal. This doesn't guarantee that the shoal will be caught on that bait, as there are a load of other factors as well, but for testing purposes, this gives a guide to what are the best baits to test with. If a value here is 0, then all the fish in the shoal will always reject the bait.

( Four groundbait preferences ) - Also, as well as the eight bait preferences, the four selected groundbait preferences are shown for the shoal. This is in the same format as the bait boxes, however the values will be a lot lower in general. This doesn't mean they have less appeal than loosefeeding the other baits though, as the groundbait works in a different way and with a different number range.


Shoal activity information

This is shown below the shoal list box and is probably the most important information for evaluating how your pegs are fishing and what problems there may be with them. There are 23 boxes in total, which some will contain information, as well as a reset button. As pegs are fished, whether in normal mode, or fast fish mode, this information steadily gets filled in, the more information though the better. Each box is split into two columns, and ideally, for information collecting purposes it is better to have high numbers in the first column, for fishing purposes it is better to have high numbers in the second column.

As a fish from a shoal comes into the area of the bait, a number of tests are made to see if it takes the bait or not. If it fails on anyone of these tests, then the fish will reject the bait, if it passes on ALL of the tests, the fish will take the bait ( a bite ). So for example, a carp comes into the area of your bait, it will probably first test to see if it likes the bait or not, using the bait popularity values descibed above. If it does, then it will probably test to see if it can locate the bait, through sight, smell, movement etc. It may seem like the wrong way around, but the order doesn't really matter as no one can see under the water in FS2 so don't see what is really happening. After that it will look for things like whether it can see the line or hook, then it will go on to examine the conditions around it to make sure that it is comfortable to feed in them conditions, eg water temperature, o2 level etc. If all of these things pass, a bite will probably come. Bear in mind though that this is happening really quick in FS2, 100's of times a second. The activity boxes show the outcomes so far of each of these tests, ie how many times they've been tested and a percentage value of how many of the tests have been passed for each. If you used FS1, and saw the function of the H key, it is very similar, however there are a lot more factors.

The first 9 entries, Temp, O2, Fish depth, Light, Saline, Cover, Flow, Ph and W. depth, should be familiar as they are used in the stk files to set fish preferences to different conditions. If all of these have had a reasonable number of tests done on them as indicated in the first column, then the second column will indicate the pass rate, if this is at 100 % then the fish is passing everytime. It maybe that a factor always stays at 0 tests ( as in the W depth in the screen shot above ), this means that, in this case the depth of water isn't a factor for this shoal, and won't even be tested.

Without going through how all of this lot works again, it's a lot simpler to just explain each.

Temp - If this is has a low pass rate, then you've not been fishing in water temperature that is optimal for the shoal. Eg, say carp like a water temp of 20 degrees and you've been fishing in water that is 5 degrees, you'll be getting a low pass rate for the shoal. If the water temperature rises, to say 15 degrees, this pass rate will increase gradually, which indicates that the carp is a lot more happier in the warmer water. There isn't a lot that can be done to adjust the temperature of the water, as it is based on the climate, but there are a few things in the venue and peg files that you can alter to raise or lower the general temperature of the water. For example, making the water more murky with a high turbid value, will probably increase the temperature of the water slightly throughout the peg, but also reduce the o2 level. If what you are looking to do though is re-create a peg realistically, then the best way will be to match the shoal behaviour to the peg conditions, by changing the stk files.

O2 - This is more or less the same as temperature, in that there is little control over the o2 levels in a peg. If the pass rate is low, then you're not fishing in an ideal spot for the shoal. O2, like temperature, changes with different depths, and generally, you'll find that the higher the temperature, the lower the dissolved O2 content in the water. Things like plants, weed etc in a peg do have an impact on the O2 level depending on the light conditions. At low light conditions, the plants will absorb O2 and emit CO2, in daylight the opposite happens, where CO2 is absorbed from the water, and oxygen emitted, which is why the advice with keepnets is not to position them close to plant growth at night, as there will be very low O2 levels.

Fish depth - This represents how well the shoal will feed at the depth you are fishing. Fishing depths are represented as percentages in FS2, with 0 % being the surface and 100 % being the bottom. If you're fishing on the surface, and the shoal is a bottom feeding species, the pass value will be low for this.

Light - Some fish like eels, catfish, and even carp prefer to feed in low light conditions. The pass value here represents how close the light you've been fishing in is to the shoals ideal light conditions. At night time, there is no light throughout the whole depth of the peg, in the daytime though, there are a number of factors ; the cloud coverage and the depth fishing are the two main ones. Deeper in the water, especially if the peg has a high turbid value will be dimmer.

Saline - This isn't used for a lot of species, and most coarse fish will pass this with 100%, as there ideal salinity level is normally 0, and the salinity of the pegs will probably be 0. This value can be used on esturary and sea type pegs though.

Cover - The pass value here shows whether you've been fishing in an area with cover requirements that match the selected shoal. Cover is represented as a percentage in FS2 with 0 being no cover and 100 being a lot of cover. Each shoal has its own ideal cover requirements, and fishing in an area closer to this cover requirement will improve the pass rate. Cover is provided by objects that are placed in the peg, and by using the F10 feature, you can get a snap snot of the cover areas and values on the peg.

Flow - or flow speed. Different fish have different flow requirements, some fish prefer no current, others prefer a strong current. The pass rate here indicates how the shoal has "liked" the flow conditions you have been fishing in. Flow is set up in the peg editor for the peg and the values of the current strength at different areas of a peg can be seen using the F10 key.

PH - This value represents how well the fish likes the PH of the water that's been fished. PH is normally changed within the peg file, however different objects placed into a peg will change the PH of the water around them areas.

W Depth - Water depth. The pass rate here shows where or not the fish likes feeding in the water depth ( in inches ) you are fishing. It's not the same as the fish depth above, because that can be altered by the rig set up, whereas the water depth is set in the peg editor. Not a lot of fish stocks have been set to have W depth values though, so it is likely that this will not be a factor for most shoals.

The rest of the boxes in this section are a little less complex, but work in the same way as the ones above. The angler has more control in most of these others though than the ones just described.

Bait - The pass rate here is a measure of how much the shoal likes the bait ( in principle ) being fished. The pass value here, will probably reflect the bait popularity values described above. It is likely though that the bait pass value will invariably be lower than a lot of other values.

Bait lrg + Bait sml - Bait large and small. There are factors in FS2, that are used to stop, for example, a small 1 oz roach taking a big boilie. If this is happening, the bait large pass value will be low, indicating the bait is too large for the shoal to handle. The size of the bait and it's ideal fish size is set within the bait file, and is also adjustable as well. On the flip side of this, there is a lesser factor, whereas large fish will refuse small baits. If the bait small pass rate is low, try a bigger bait.

Hook sz - Hook size. If this pass rate is very low, then it is likely that you are fishing with too big a hook for the bait you are fishing with and the hook is visible to the fish. Eg, try fishing a single maggot on a size 8 hook, and watch this fail miserably. Changing to an 18, or even 20 will help push this pass rate up, in this case. The size is not the only reason this may fail as well, hooks have colour and contrasting coloured hooks to bait can sometimes affect this pass rate to a lesser effect though. The ideal hook size for each bait is specified within the bait file.

Sight - This incorporates loads of things, for example, if the pass rate is low, it could be that the fish isn't seeing the bait. This can occur if a shoal uses sight to detect the bait and the bait colour is similar to the surrounding objects in a peg. Also, the fish could see the line as well, a thick line will probably lower the pass rate of this factor. The colour of the line is important to here, in the same way as bait colour, however the opposite is the desired effect here, in other words, it is better to have line that doesn't contrast with the surrounding objects in the peg. You can use the F10 key to check out the bottom colours on a peg, but on top of this, loosefeed and groundbait do change this colour too for a time. Eg, if fishing an area of mud which is dark brown, and a load of corn is thrown in ( come on you yellows ), the bottom colour will change slightly to a more yellowy brown, until the corn disipates. This means that it is advantageous to fish a contrasting bait colour and loosefeed or groundbait colour.

Tide - This is only a factor with sea venues and sea fish. If, for example, you are fishing at low tide, and the shoal prefers high tide, then the pass rate on this will be low. The same is true, also for fishing at high tide with a shoal that prefers low tide. If you are fishing at the perfect tide for the shoal, the pass rate here will be high.

Tide dir - Tide direction. Shoals can be set to feed better when either the tide is coming in, or going out. If a shoal, for example, prefers to feed when the tide is going out, and you're fishing with the tide coming in, the pass rate here will be low.

Bait->W - Bait to water. Within each bait, there is a freshpop and a seapop percentage value. If you're fishing in the sea with a bait that has a low seapop value, you will be getting a low pass rate here. The same is true for freshwater venues as well, fishing with sea baits.

Art - Artificial. This factor is a measure of how attractive your artificial lure or fly is to the shoal. Lure and fly fishing is impossible to test, because it relies heavily on how the lures or flies are used by the angler, eg jigging the lure up and down, retrieving it at different speeds etc. What this pass rate shows is how well you have been using the fly or lure combined with the attractiveness of the fly or lure to the fish.

Sea type - This pass rate indicates whether the sea type ( beach, rocks, estuary etc ), matches up with the shoals preferences. A low pass rate indicates that the sea type isn't ideal, eg pollack are caught in rocky areas, and if fishing a beach, it is likely that the pass rate for a shoal of pollack will be low.

Month - Time is not a natural concept, so this factor isn't used often in shoals. It's use is very artificial, for example, a fish doesn't have a little calendar and when a certain time of the year is reached, it says, I must feed more, or less etc. That is why not many shoals have month values in them, there are exceptions though because FS2 doesn't take into account fish breeding habits, which are based on the time of the year. This isn't strictly true though, as in reality these are probably triggered by natural events such as temperature change, rainfall etc. A situation where it would be acceptable to include month values in the shoal is with sea trout for example. If a river peg has been created that is close to the sea, the sea trout will only be present around Autumn, where they will come into freshwater to spawn, therefore month values could be set for the shoal to set this behaviour, making them non-existent in all but Autumn months. If a shoal has got month lines, then the pass value here will reflect whether or not the ideal month for the species is being fished.

Noise - Different fish react differently to disturbance, which is set within the caution lines in the stk files. When things like heavy feeders and weights are cast into shallow water, this will spook the fish and create noise. If too much noise for the shoal, then they will scatter and won't feed there. Noise in the areas of FS2 doesn't stay forever though, it calms down quite quickly. Noise can also be created when reeling fighting fish in, affecting those areas. Further below is an explanation of how you can find out what the current noise value is in the area you are fishing.

Over fed - Another question often asked is, can you kill a swim with over feeding ? This proves the answer given, "yes" is true. If you bang too much groundbait or loosefeed into an area and fish that area, the chances are that the fish aren't going to be nibbling at your bait, but the hoards of loosebait there. This is especially true if feeding a loosebait that dissipates slowly in the water. The best way is to achieve the correct balance, by light feeding, in short intervals, instead of banging loads out in one go. If the areas you've been fishing have been over baited, the pass rate on this factor will be low.

Size fact - This is a very artificial factor, but was deemed necessary shortly after FS2 was released to put a "cap" on unrealistic fish sizes being stocked in venues, and no apologies are given for it either. Basically this is all about the MAXSIZE and DIST lines in the species file. If you've read this far on this page, this may answer a lot of questions about why certain fish aren't caught often :)

Take for example a roach, which the specimen size is regarded as 2 lbs ( 512 drams ), in other words there aren't many roach of 2 lb or higher around. In the roach.sp file it may have the following lines

MAXSIZE = 512

DIST 1 100.0
DIST 2 90.0
DIST 3 80.0
DIST 4 70.0
DIST 5 60.0
DIST 6 50.0
DIST 7 40.0
DIST 8 30.0
DIST 9 20.0
DIST 10 10.0

Firstly, the specimen size of the roach is given as 512 drams ( in the MAXSIZE line ). Then there is 10 DIST lines ( 1 - 10 - read these as 10%, 20%, 30% etc instead of 1 to 10 ) each has a percentage value ( 0 - 100 ) to show how popular the size of fish is distributed.

If a roach shoal is say 25 drams, then this is between 0 and 10% ( DIST 1) of the MAXSIZE, therefore it has a distribution of 100 %, meaning it is very widely distributed and no capping will occur with roach this size. However, if a roach in a shoal is 120 drams, then this is aprox 23 % of the MAXSIZE ( DIST 3 ) meaning that there is a 90% distribution of this sized roach.

Calculator time : For working out which distribution category a fish fits into, do the following.

Divide the fishsize by the MAXSIZE value. eg ( a 300 dram roach ) = 300 / 512 = 0.58

Multiply this value by 10 and round up : 0.58 x 10 = 5.8 = ( rounded up ) = 6

If the value is greater then 10, reduce it to 10.

In other words this fish fits into distribution category 6, which has a distribution of 50 % ( See DIST lines above ).

You can, like with other values, override the default distribution values in the sp files, in your own stk files, by adding the following lines for example : ( note these are for STK files not SP files )

SPECSIZE = 1024

DIST 1 100.0
DIST 2 100.0
DIST 3 100.0
DIST 4 100.0
DIST 5 100.0
DIST 6 100.0
DIST 7 100.0
DIST 8 100.0
DIST 9 100.0
DIST 10 100.0

The changes this makes, you'll have to work out for yourself though, and if all 100's are set, then FS2 will cap these down automatically anyway. The best way of getting FS2 to totally ignore this factor within an STK file is to have a line SPECSIZE = 30000, which will set the specimen size to 30,000 drams, which means that most will fit into distribution category 1, which you can set to 100%

Okay, putting the maths away, thankfully and getting back to what the pass rate actually means. If the pass rate is low, then it is likely that the shoal size distribution is small for the species of fish, you can adjust this by adding SPECSIZE lines in the stk files.

It's artificial I know, but something had to be done, at the time.

Reset button - The reset button can be used to reset the results for the shoal back to zero, to start sampling a fresh. It is really useful, because when testing pegs, and you alter the bait, or cast to a different area, change the depth etc, you will want to clear the previous data so that you can get an accurate picture with the new settings for the shoal. This is the way it is meant to be used, by casting into certain areas, with different settings, and sampling the data so that the results can be used to adjust the stk files. To do this though there needs a way of knowing what the conditions are like in the area casted first ( a bit like the digitherm ), that is explained below :


Information on area casted

Like the digitherm, the F11 feature can be used to get information about the area that either rod is casted into, depending on which rod is being held at the time. There is a bit more information though than the digitherm, as also included is the flow, depth, cover and noise. This information is shown in the bottom right corner of the screen, below the yellow name of the rod that is being held.

This information is really useful for testing the area casted with certain shoals, especially on fast fish as the information is collected quicker.


Final note

There are a few other things that need to be known as well, but these are more to do with using this with fast fish, other than anything else. When fast fishing, noise, loosefeed and groundbait factors are ignored. These features rely on time, so no noise, or over fed failures will occur when fast fishing. This may also account for the extra catches in fast fish mode, on top the fact that the fish doesn't have to be reeled in, and the bait recasted each time.


(c) J.C.Spooner 2002